WEBIX JAVASCRIPT LIBRARY BLOG

UI development best practices, front-end programming tips and news to speed up your Web development.

Follow us:

Write for us: learn about our guest posts guidelines.

How to Create Kanban Board with Webix

During the process of web development it’s highly important to organize the workflow and keep in touch with all members of the team. There are useful tools that allow visualizing all the stages of work and keeping track of each participant’s current workload. One of such tools is a popular Kanban board. It helps to control work processes and maintain steady progress, as you can see what stage of the project should be speeded up and which one is overloaded.

JavaScript Kanban Board is a great widget that can be used for creating powerful apps intended for managing the development process.

In this article we’ll describe the stages of creating a basic Kanban Board with the Webix library. Tasks on the board will be supplemented with tags, images and personal avatars for tasks’ assignees. There will be icons that allow opening a form for editing tasks. Besides, you’ll learn how to customize the styling of the board.

webix kanban board

You can check the live demo of the ready Kanban Board.

Checkboxes in DataTables. Little-known techniques

You probably already know that DataTable has the ability to show checkboxes instead of plain text data. It allows you to provide a simple solution for status marking and data selection.

Basic checkboxes

The minimal code for initializing a DataTable with checkboxes will look as follows:

webix.ui({
  view:"datatable",
  columns:[
    { id:"status", header:"Is Active", width:80, css:"center",
        template:"{common.checkbox()}"},
    { id:"value", header:"Records", fillspace:1 },
  ],
  data: [
    { status:0, value:"Record A"},
    { status:1, value:"Record B"},
    { status:0, value:"Record C"}
  ]
});

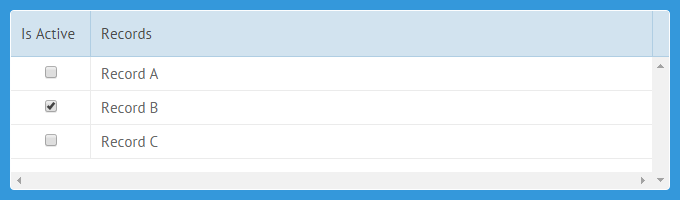
It will result in a nice-looking JavaScript grid presented in the picture below. The “{common.checkbox()}” line in the template expands in a checkbox control.

Basic Webix Checkboxes


Live Demo >>

Drag-and-Drop within Webix Widgets

Webix features the drag-and-drop functionality that is available not only for desktop but also for mobile devices.

The library allows making drag-and-drop operations within a widget itself as well as between a few different widgets or even between the same widgets. In this article it goes about drag-and-drop operations within Webix data management widgets.

Learn how to implement this functionality with ease.

Drag-and-drop modes

Firstly, make sure that both target and source widgets have the drag property set to true. Basically, it is enough to enable drag-and-drop.

webix.ui({
    view:"treetable",
    ..//treetable config
    drag:true
})

Integrating Webix and Struts Website with Database

It is the last part of the tutorial that tells about developing a website by using Webix UI library and Java framework Struts 2. If you haven’t read the previous parts yet check the first and the second parts in the Webix blog.

Nowadays nobody is interested in static data. That’s why our website should be able to download a list of events and reports from database and save all the implemented changes. We will use the most popular database MySQL.

The database structure is simple. It is represented in the image below. We will use two tables for storing events and reports. Each record in the table “speakers” contains the event_id a certain report is related to.

webix and struts database

1 13 14 15 16 17 19