Today, we are excited to introduce Webix 11.4, bringing a fresh wave of enhancements and upgrades across the library. This release delivers new features in Core, Kanban, and Rich Text Editor – with the SpreadSheet widget as the main highlight, as it comes with major updates to both functionality and APIs. No time to waste – let’s take a detailed look at what’s new.

Core Updates
Support for Axis‑Aligned Titles
The Slider widget now supports axis titles – labels that are displayed along its horizontal or vertical axis. Titles are generated automatically and can be customized. This feature was introduced to make sliders more descriptive and visually clear.
To activate the new functionality, set axisTitles:true and define min, max and step values in the Slider’s configuration – the widget will use these range-defining properties to create the titles.

Check this snippet for more practical examples, including customization options.
End-User Area Multiselect
This time Webix Core was enhanced with end-user multiselect support. The new feature complements the existing capability to apply area multiselect programmatically via the dedicated API. Now, users can select multiple single cells and cell ranges with Ctrl+click and Ctrl+drag. This improvement makes it much easier to manipulate several data segments at once in components that work with complex data, particularly DataTable and SpreadSheet.

Kanban Updates
Markdown Support
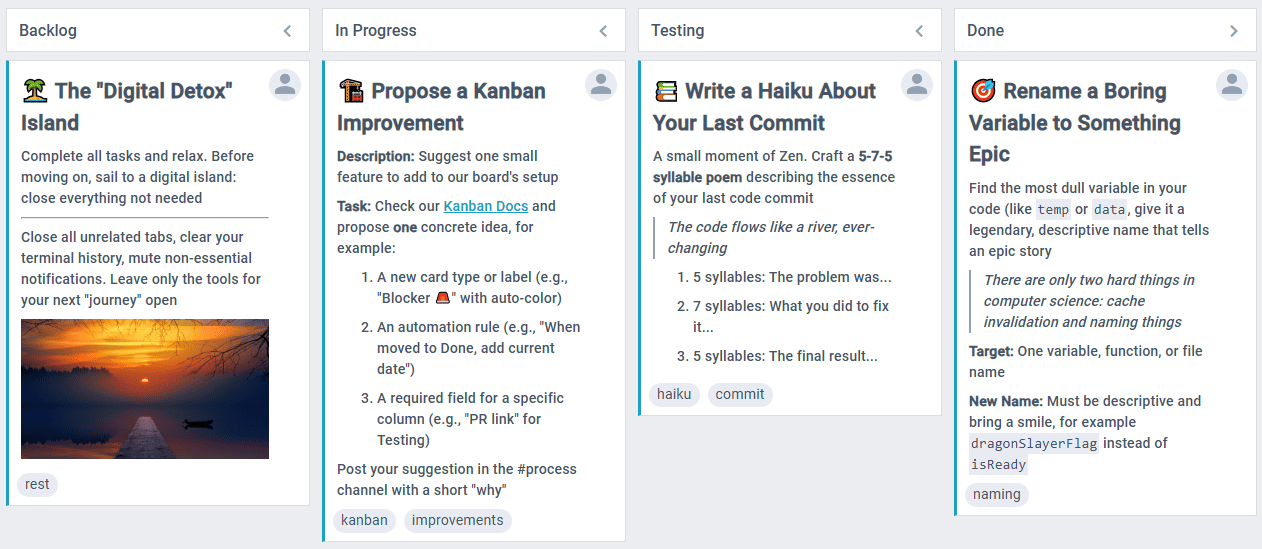
This time, we upgraded the Kanban widget with Markdown support, making it much easier to work with content produced by AI assistants. Earlier, this capability was introduced in the Rich Text Editor. Now, you can copy text from your favourite AI tools and paste it into Kanban cards while preserving all formatting.
To enable this feature, add the textFormat property to the Kanban configuration and set it to “markdown”. The default value of the property is “text”.
view:"kanban",
textFormat:"markdown",
/* structure, data, and other settings */
});
Please note that our Markdown parser does not support nested structures (except bold inside italic). In practice, this means that if you insert, for example, bold text inside a link, italic inside a list item, or multi-level lists into the card, they will not be displayed correctly.
Our built-in Markdown parser is intentionally minimal, but we don’t aim to limit you – feel free to swap it if you need an alternative solution. To do so, you can simply redefine the templateBody of the cards:
name: "cards",
templateBody: function(obj){
// markdownToHtml can be replaced with any 3rd-party parser of your choice
return `<div class="webix_kanban_body_markdown">${this.markdownToHtml(obj.text)}</div>`;
}
});
SpreadSheet Updates
Grouping Rows and Columns
In this release we introduced grouping in SpreadSheet. You can create row and column groups, and then collapse and expand them when needed. This is what makes your work with complex spreadsheets much easier – e.g. you can significantly improve the readability of the table’s content by expanding only the sections related to the current task and collapsing all the rest. You are free to create nested groups that can contain up to eight levels of hierarchy.
To apply grouping you need to select the cells in the rows or columns you want to group or ungroup and use Alt+Shift+Right for grouping and Alt+Shift+Left for ungrouping. These hotkeys open a dialogue window where you can choose which items you want to group or ungroup – rows or columns. You can also do that via the corresponding options in Toolbar, Menubar and context menu.
You can also manage grouping programmatically through the API – with detailed documentation available here.
Area Multiselect
Together with the multiselect enhancement in Webix Core, the same capability is now available in SpreadSheet. You can easily select non-adjacent areas and apply formatting, remove values, or fill cells with formulas across multiple separate ranges.
Multiselect in SpreadSheet is also supported at the API level: you can pass multi-range references (e.g., A1:C3;B4:D5) to apply styles, remove values, or get and set cell values programmatically.
Enhanced Sorting
This release brings a major upgrade to the SpreadSheet sorting algorithm. Previously, sorting was applied strictly to the selected area and did not preserve row integrity.
With the new update, each row in the selected range is treated as a single unit. This means that when you sort a range, all cells in each row move together, fully maintaining the logical structure of your data. This enhancement makes sorting intuitive and safe for tables that contain formulas, references, or structured records.
To align the UI with this improvement we introduced a new Sort Range item in the Context menu which contains Ascending, Descending and Custom Sort sup-options. The Menubar now has two items with submenus: Sort Range for the operations on the current selection and Sort Sheet that operates on the entire sheet. Please note that sorting is not supported for multiselect.
As for the existing sortRange method – it remains fully compatible, but now supports an extended configuration object, allowing to specify the sorting column, direction, and whether the range includes headers.
hasHeaders: true,
levels: [
{ column: "C", direction: "desc" },
{ column: "A", direction: "asc" }
]
});
Paste Transposed Option: Flip Rows and Columns
Spreadsheet now allows you to flip selected rows and columns when pasting data. This means you can rearrange your dataset preserving the formatting, e.g. converting horizontal headers into vertical lists and vice versa.
The feature is accessible from the Spreadsheet’s Context menu: copy the cells you want to transpose, and then choose Special paste → Paste transposed to switch horizontal and vertical values.
Statistics for the Selected Cell Range
Webix SpreadSheet now provides statistics for the area you select on the sheet. If you have ever used Google Sheets or Excel, the feature will feel very intuitive and familiar to you as it follows a similar logic applied in these tools. When you choose a cell range, you can now find Sum, Average, Min, Max, Count and Numerical Count values in the bottom right corner of the widget next to the zoom controls. This new functionality simplifies working with data: users can verify the figures without applying formulas, check calculation results, and analyze data on the fly.
Note: SpreadSheet uses the same pattern as Google Sheets for the operations on the selected range: for Sum, Average, Min, and Max it calculates only numeric data and ignores text and empty cells; Count shows the number of cells filled with any data, while Numerical Count – the total of cells with numeric entries.
Column Resize on Touch Devices
In one of our recent releases, we introduced column resize on touch and hybrid devices for Webix Grid*. In this release, Webix engineers added the same option to SpreadSheet. Now users can resize SpreadSheet columns, adjusting them to a comfortable width for viewing and editing data on touch screens.
You can activate this feature in the new tableConfig property by setting icon:true in the resizeColumn object configuration.
view:"spreadsheet",
data:spreadsheet_data,
tableConfig:{
resizeColumn:{icon:true}
}
});
Live demo >>
Try it on mobile >>
By specifying icon:true, you switch from the original resize mode, when the content is re-rendered after you finish the drag, to live column resizing. This means that now when you move the resize icon the SpreadSheet table refreshes in real time.
Although live resizing is a very handy option, please, mind that it has a higher performance cost. That is why we recommend turning it off if your SpreadSheet handles large numbers of columns. To disable the feature, set live: false in the resizeColumn object configuration.
view:"spreadsheet",
data:spreadsheet_data,
tableConfig:{
resizeColumn:{icon:true, live: false}
}
});
* Webix Grid is a standalone product released independently of the main library. All updates introduced to Grid are also applied to the DataTable component in Webix Core.
Excel‑Style Border Rendering and Types
Excel-style cell border behavior is now available in SpreadSheet. Initially, the widget uses a model where all four borders are rendered for each cell. In this release, we added support for Excel-like shared borders to improve compatibility with Excel files.
The new mode can be enabled with the borderCollapse property set to true. By default, borderCollapse is false,meaning SpreadSheet uses its default behavior and adds all four borders to cells.
view:"spreadsheet",
toolbar:"full",
borderCollapse:true,
//other settings here
});
This is how your cells will look with the new mode turned on:
Excel-like borders
Compare it with the default border rendering:

Default borders
With this update, we’ve expanded the list of border types supported by SpreadSheet with seven additional options: hair, dashDotDot, dashDot, mediumDashDotDot, slantDashDot, mediumDashDot, mediumDashed. Now, the component provides all border variants available in Excel and preserves them during import and export.
Together with adding new options, we also adjusted several border types to make them look just like Excel’s borders do:
- hair now looks the way dotted previously did (a 1px dotted line)
- dotted renders the way dashed used to (a 1px dashed line)
- dashed now has a new, updated style
Border types are available in the Toolbar via Borders → Border line type:
Check out this live demo to see all the border types you can now use in SpreadSheet.
You can refer to the documentation for more details on how the new border-rendering mode works and how to configure SpreadSheet to apply borders correctly.
Updated API
This release introduces several API improvements that make it easier to configure the SpreadSheet table, run calculations in code, and control how custom formulas are rendered. Below is a short overview of the new capabilities:
- tableConfig property – gives you direct access to the SpreadSheet table configuration. Now, you can adjust how the table looks and behaves by defining custom CSS, row height, column resizing, etc. See the snippet.
- calculate(math, page) method – allows you to apply formulas and compute their values programmatically. See the snippet.
- $mathTemplate method – defines how a formula result is visually rendered in a cell. It works alongside registerMathMethod, which specifies the internal value returned by the formula and used in all further calculations. See the snippet.
Rich Text Editor Updates
Drag-and-drop for Images
Rich Text Editor now supports dragging and dropping images in the content area. Users can place images exactly where they need them without using the Toolbar, Menubar, or context menu. This new capability speeds up image-heavy content editing by making it easier to move and position visual elements.
Inserting Text as Markdown
Previously, Rich Text Editor processed the paste operation in the following way: any pasted text was automatically converted to Markdown. In some use cases this led to unexpected results when users wanted to add plain text to the editor or when the pasted content contained Markdown syntax that the editor does not fully support (e.g. some nested structures).
Now, Rich Text Editor pastes content as plain text by default. If you need to insert Markdown, you can use the new Paste from Markdown option in the Menubar or context menu, which lets you explicitly add text as Markdown when needed.
Inline Images
Users can now add images to Rich Text Editor even when no upload endpoint is provided. Previously, a valid URL was required, otherwise, attempting to add an image through the Toolbar or Menubar resulted in an error. With this update, the upload URL becomes fully optional.
Now, when no upload value is provided, the editor automatically inserts images inline by encoding them as base64. This means that image insertion works out of the box, and needs no extra setup.
This improvement makes Rich Text Editor more convenient to use in workflows that are designed to operate without dedicated file storage. See this snippet for an example of inline image insertion.
API: insertValue Method
The Rich Text Editor API was upgraded with an insertValue() method that allows adding values at the current cursor position. Unlike the setValue(), which replaces the entire content, the new method lets you update specific parts of the content without resetting the full editor value.
The method supports HTML (default), Markdown, plain text, and raw formats.
$$("editor").insertValue(md, "markdown");
Here’s an example snippet demonstrating the method in action.
Other Updates
Check out the What’s New page for a detailed breakdown of all recent Webix updates and optimizations. To get the latest version of the library, upgrade via npm, the Client Area, or use the button below. Have questions or ideas? Join the discussion on our forum.