Welcome to the generation of AI, where you can work smarter and faster. Gone are the days when you needed to build stuff from scratch. Everything in the technology space is now simplified.

The world is shifting towards AI, and OpenAI, the leading research and AI development company, provides APIs that are widely accessible. Instead of investing in building costly AI engines from the ground up, companies, small businesses, developers, and individuals use OpenAI APIs to create AI-powered applications.
Today, anyone, “yes! anyone” can utilize OpenAI APIs to develop powerful and innovative apps, whether for predicting cryptocurrency markets, diagnosing diseases, or generating personalized workout routines. With complexity hidden behind easy-to-use APIs, developing AI-powered applications is now within everyone’s reach.
While there are OpenAI APIs, building frontend apps with JavaScript frontend libraries that utilize these APIs should be straightforward, right? You don’t need to create web components from scratch when you can leverage ready-made UI components with a frontend library like Webix.
This article will cover the steps to use an OpenAI API to develop an AI-powered Text-to-Speech application. It will also explain how to create elegant interfaces and UI components with Webix, to develop a well-polished AI-powered web application.
We will build a fully functional Text-to-Speech application using:
- OpenAI gpt-4o-mini-tts model
- Webix library for the UI
- JavaScript for API integration
What are APIs and What are OpenAI APIs
An application programming interface (API) is what serves as a means of data exchange between software applications. When an API is utilized, it requests data from some backend and then returns responses commonly in JSON format which you can display, parse or manipulate. OpenAI on the other hand have packaged their models into APIs, these APIs give you access to AI models built to solve different tasks. For every API released, you can use and customize them in ways that suit you.
If you are just getting started with OpenAI APIs, you’d need to sign up to use any of the models with the following link. You can either sign up with an email and password, or a Google, Microsoft or Apple account.
In this article, we will be using the gpt-4o-mini-tts model via the OpenAI Audio API audio/speech endpoint to convert text into natural-sounding speech.
Before you use any OpenAI model or any OpenAI API, you’ll need to obtain an authentication token. It is this token that you would use to authenticate your requests with OpenAI. Use the link below to obtain your authentication token, make sure to keep the token in a place where you can easily access it at anytime:
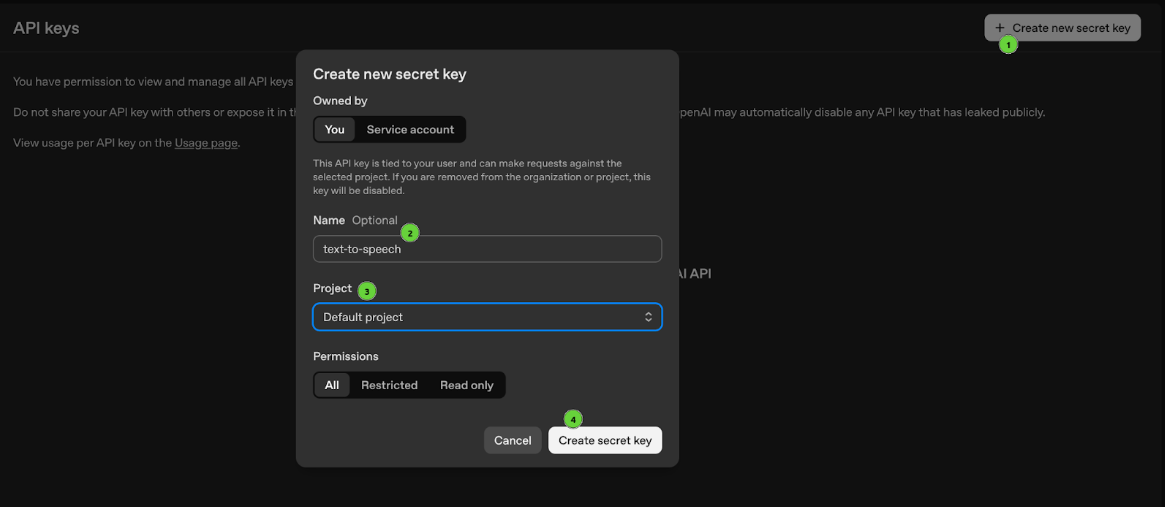
Creating new API Secret Key
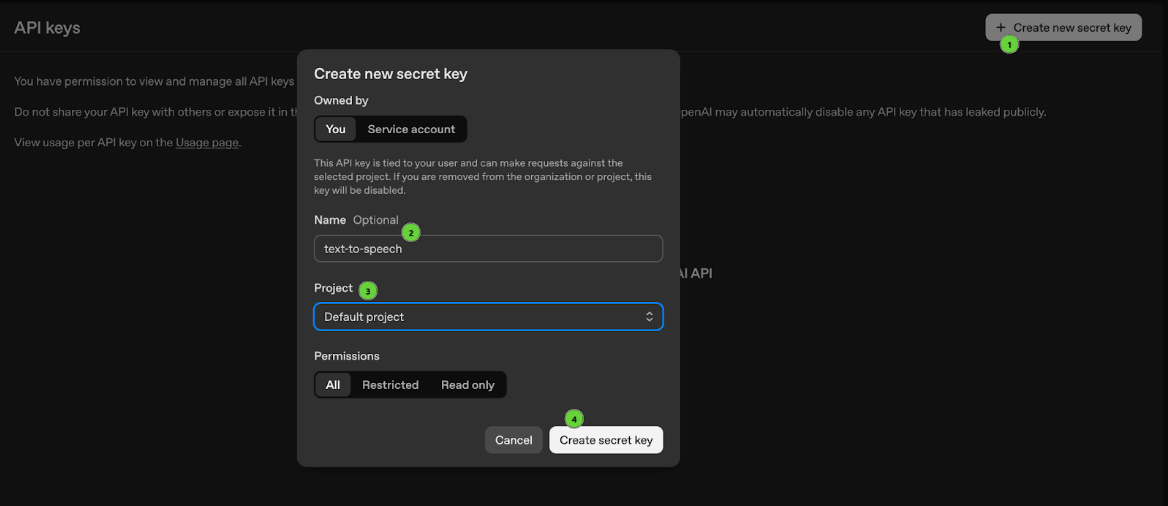
Copying new API Secret Key
Obtaining an API secret key is just one of the pre-steps before utilizing OpenAI APIs. The models are not free therefore, you’ll need to add billing information and then make an initial payment.
Pricing and Billing
To add billing information you need to visit the following link. For the most part, the GPT-4o-mini-TTS model costs $0.60 per 1 million text tokens and $12.00 per 1 million audio tokens. If you set an initial payment of $5, you can make approximately 125-150 conversions of 1000-word articles, as each conversion utilizes both text tokens (for input) and audio tokens (for the generated speech). We will ensure that we do not exceed or use more than half of your initial payment (supposing your initial payment is $5), so your actual usage will remain well within $2.50 worth of tokens or even more for you to use later.
We have our API secret key and we have added billing information, we can now test the text-to-speech API.
We’ll be using a tool called Curl to test the API. However, do not forget to replace YOUR_API_KEY_HERE with your actual API KEY in the command below.
-H "Authorization: Bearer YOUR_API_KEY_HERE" \
-H "Content-Type: application/json" \
-d '{
"model": "gpt-4o-mini-tts",
"input": "Hello! This is a test of the text to speech API.",
"voice": "coral",
"instructions": "Do not sound polite"
}' \
--output speech.mp3
Check this link to know more about the usage of the text-to-speech API from OpenAI.
Integrating the OpenAI API with Webix
Webix simplifies the development of user interfaces in JavaScript. Instead of trying to manage both the logic of your application and the styling of components, it allows you to concentrate entirely on your app’s functionality.
Since Webix supports smooth API integration, we can easily connect it to the OpenAI text-to-speech API to deliver a more engaging user experience.
Create a project directory, either in your home directory or desktop and give it a name. For example, openai-and-webix. Then, open it up with your default code editor:
code .
Create an index.html file and add the initial structure with links to the Webix CDN to style the app with the Material skin and enable the functionality. Let’s also include a reference to the app.js file as a module – this is where we’ll add the UI and wire in the custom logic of our application a bit later:
<html>
<head>
<link rel="stylesheet" href="https://cdn.webix.com/edge/skins/material.css" type="text/css">
<script src="https://cdn.webix.com/edge/webix.js" type="text/javascript"></script>
<style>
</style>
</head>
<body>
<script type="module" src="./app.js"></script>
</body>
</html>
To generate code for the UI of our app, we’ll use Microsoft Copilot, which leverages OpenAPI models in its architecture. We have settled on this AI assistant as a familiar and reliable tool for drafting code. You are free to stick to any other tool you are comfortable with, including ChatGPT. Below, you can find the prompt we utilized:
“Create the UI for a text-to-speech conversion page. This page will be integrated with the OpenAI text-to-speech API. Use the Webix UI library and build the interface as a single webix.ui instance containing all necessary components. Research the most optimal configuration.
The left section should include:
- a form with the following elements:
- a section below the form with a template for the player
– a textarea for entering the text to convert;
– a select dropdown with voice options available in the OpenAI text-to-speech API;
– a second textarea for conversion instructions;
– a “Convert” button that triggers the backend API call;
– a “Clear” button that resets the form fields;
– validation rules and error messages for the text and voice selection fields (both must be non-empty);
– sufficient spacing for field labels to prevent truncation.
The right section should contain a Webix datatable that displays conversion results and has the following columns:
- a timestamp of the conversion (MMM DD, HH:mm);
- a preview of the converted text;
- the voice used;
- a “Play” button in each row to play the corresponding audio;
- sufficient spacing for the cells content to prevent truncation;
- initial record as an example: “This UI is built with Webix.”.
Create a template for the status bar to display some content during the text to speech conversion operation. Add IDs to the components listed above.”
Now, we can copy and paste the script suggested by the AI assistant into the app.js and adjust it as needed – change IDs, add placeholders, integrate new functionality or expand the interface with some extra elements.
This is how we’ll refine the generated code:
- update some IDs;
- add a placeholder to the Instructions input;
- add validation messages for the text and voice selection fields;
- customise voice options in the select view;
- add padding to the layout and style the “Play” button to make the UI look better;
- hardcode the audio URL to a sample MP3 file hosted on Webix’s backend for demonstration purposes.
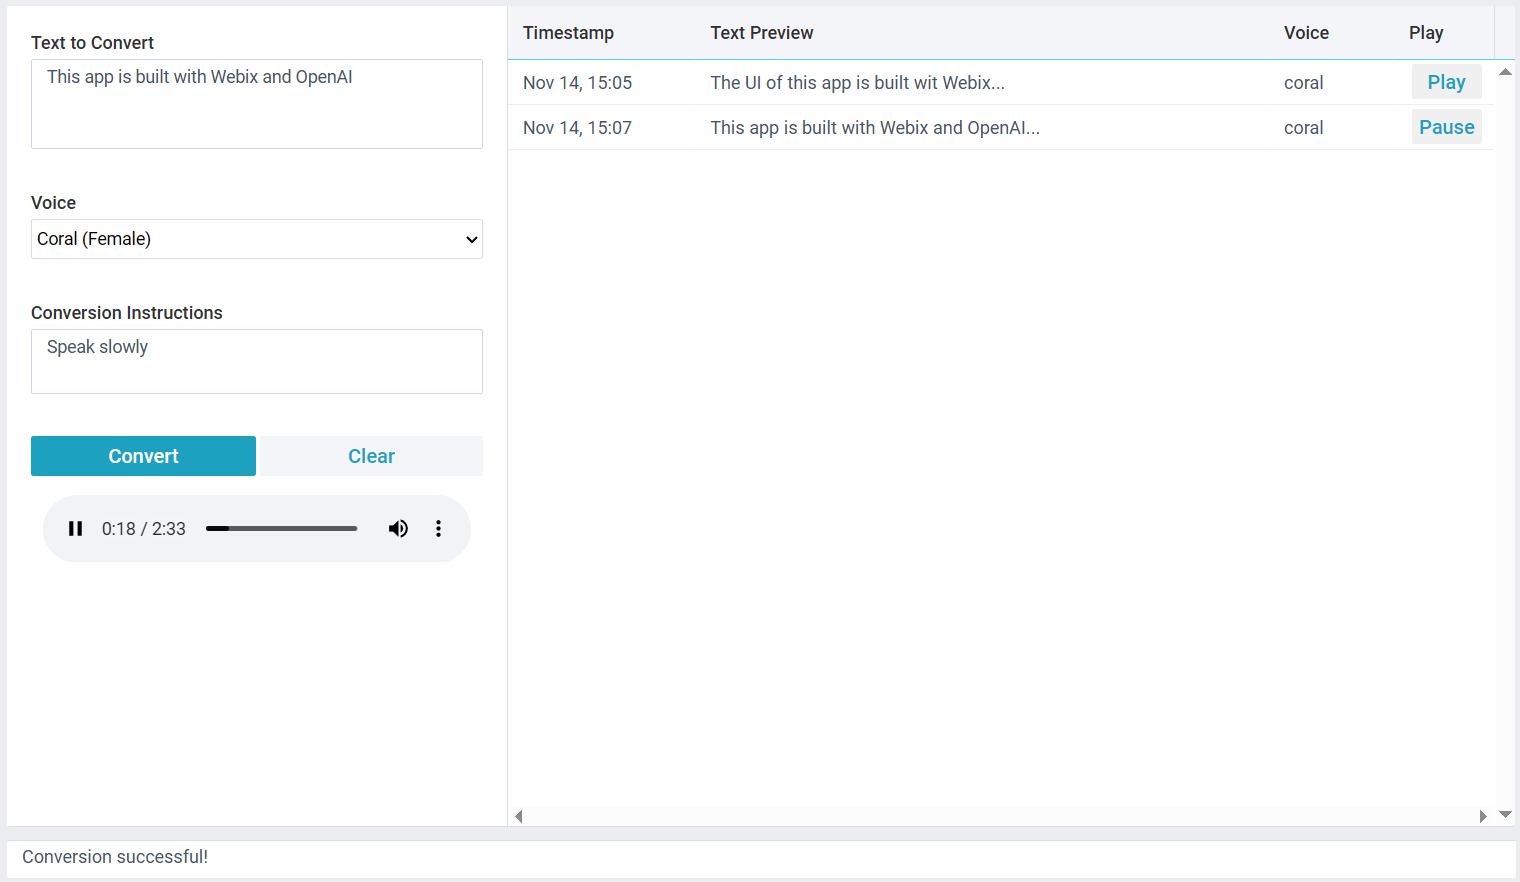
Below you can see the UI we built using AI and then optimized with human input. The fully updated working code – ready to copy and paste into your project – is available at the link below the image:
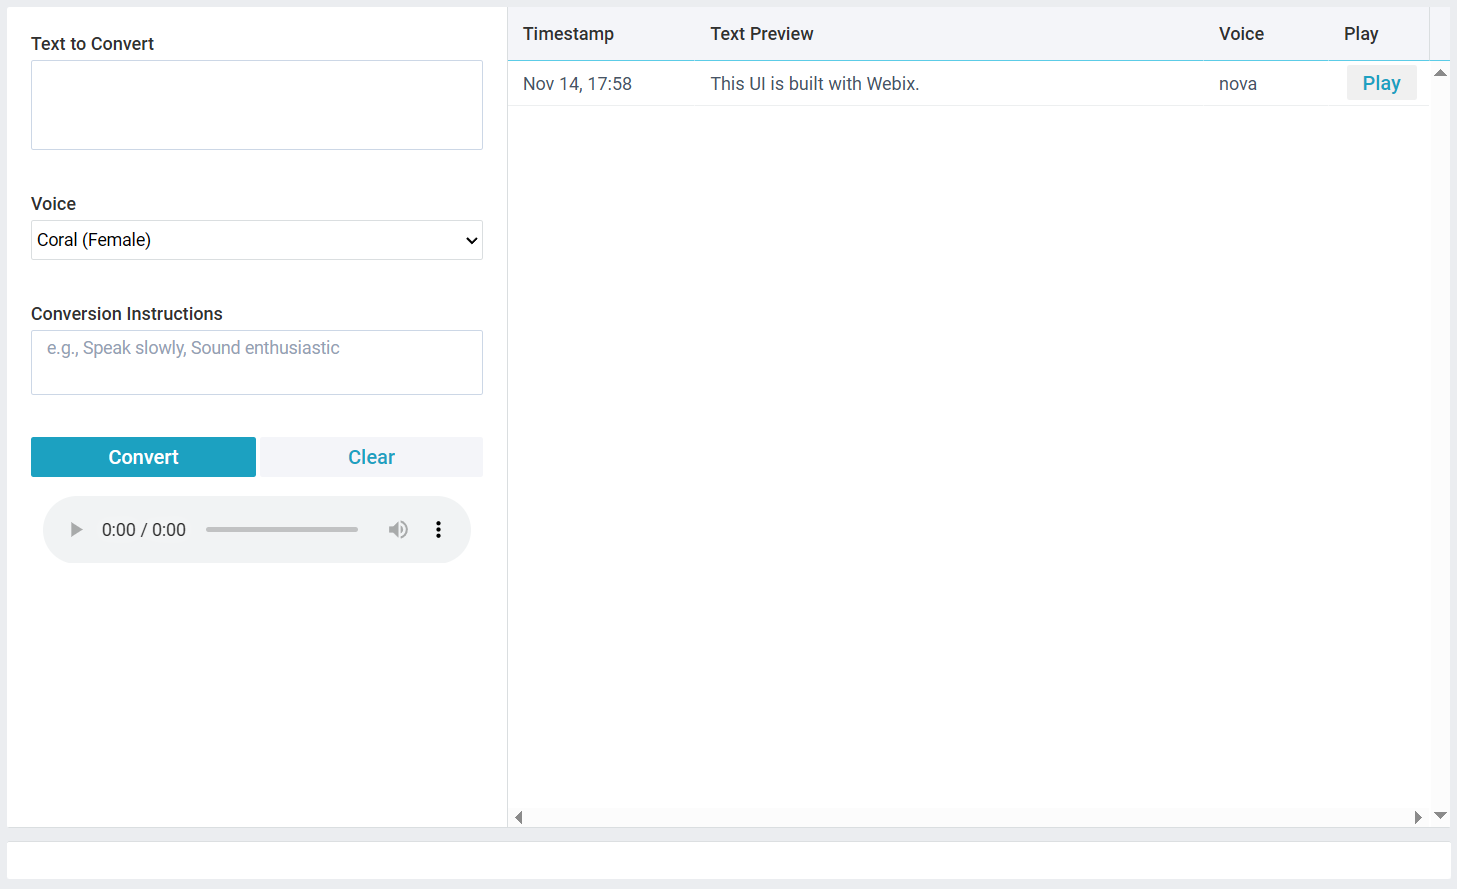
View the demo for the Text-to-Speech UI
Next, create a constants.js file and include the following code:
const API_URL = '<https://api.openai.com/v1/audio/speech>';
What this does is define the API key (the one obtained from here) and the API endpoint needed to connect to the OpenAI text-to-speech API.
To fully integrate the OpenAI text-to-speech API with the Webix UI layout defined above, let’s create a helpers.js file and generate JavaScript logic for our app using the following prompt:
“Create a JavaScript function that integrates the OpenAI text-to-speech API with a Webix form. The function will be triggered on pressing the “Convert” button inside the form and should do the following:
- get values from the Webix form (text, voice, instructions);
- add the API key check (ensure it is defined and not set to the default placeholder);
- send a POST request to the gpt-4o-mini-tts model and return an MP3 blob;
- update a dynamic audio player and add the result to a Webix DataCollection bound to a datatable;
- disable the “Convert” button during conversion to prevent multiple requests;
- include error handling with Webix;
- update the status bar.
Create a helper function to play audio from the history table. Sync the audio player with the datatable “Play” button. The code of the UI you’ll need to build this logic is attached.”
We’ll improve the code received from the AI assistant in the following way:
- optimize the sync logic between the audio player and the table “Play” button;
- remove repeated validation of inputs;
- place Webix DataCollection in a separate module for maintainability;
- add logic for testing the functionality without the API key (for demonstration purposes).
In the snippet below, we wired up the functionality we’ve just built with the UI we created earlier. You can now check how the application works. We’ve added some static sample data for testing, which you’ll need to remove once you connect to the OpenAI API with your personal API key:
View the demo for the Text-to-Speech UI and code logic
You can find the full source code of the app on GitHub.
This is what we managed to achieve in just half an hour: a fully working app developed with OpenAI API for text-to-speech conversion and Webix for a user-friendly UI.
Conclusion
You build faster and smarter by using existing resources. In this article, we created a working application efficiently, utilizing the OpenAI text-to-speech API for multiple voice options and Webix for a sleek, interactive interface.
There’s a lot more you can do with Webix. The library offers a wide range of UI components for various use cases.
How about you build your own AI-powered application, utilizing a different model and building it elegantly with some JavaScript code and Webix?