The reason
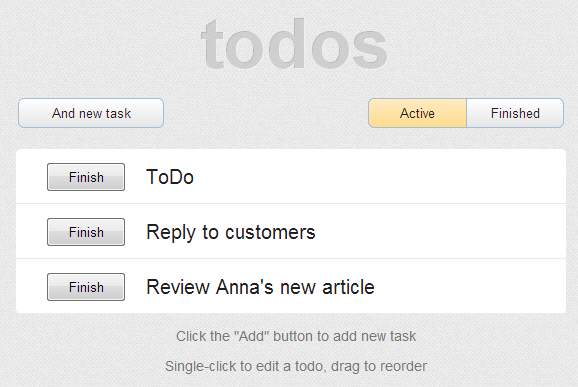
Webix is mostly a UI framework, it is oriented for usage in complex client side apps with a lot of controls and complex business logic. At the same time, it can be effectively used for solving common tasks without the necessity of learning any third party libraries. Let’s check these Webix features by creating a simple “ToDo” app. The ToDo App is like a “Hello World” for frameworks. It is the basic app, which shows how the main functionality of the framework can be used.

You can grab the code of final version from GitHub or check the online demo.
First steps
Let’s start from creating the main page of our app – index.html:
<html>
<head>
<meta http-equiv="Content-Type" content="text/html; charset=utf-8" />
<title>ToDo List</title>
<link rel="stylesheet" href="//cdn.webix.io/edge/webix.css" type="text/css" media="screen" charset="utf-8">
<script src="//cdn.webix.io/edge/webix.js" type="text/javascript" charset="utf-8"></script>
<link rel="stylesheet" href="./app.css" type="text/css" media="screen" charset="utf-8">
<script src="./app.js" type="text/javascript" charset="utf-8"></script>
</head>
<body>
<h2>todos</h2>
<div id="app_area"></div>
<footer id="info">
<p>Click the "Add" button to add new task</p>
<p>Single-click to edit a todo, drag to reorder</p>
</footer>
<script type="text/javascript">
webix.ready(function(){
webix.ui(app.ui);
});
</script>
</body>
</html>
The code of this page contains two blocks of includes. The first block includes js and css webix files. The second adds the app.js and app.css to the page. Those files will be used to store the logic and the styling of our app. At the end of the page we have a webix.ui call, which will init the app. That code is placed inside of webix.ready block to ensure that ui initialization will start only when page is fully loaded.
To finish the first step, let’s configure the ui of the app in the app.js:
{view:"button", value:"And new task", align:"left", width: 150 },
{},
{view:"segmented", id:"selector", width: 200, align:"right", multiview:true, options: [
{ id:-1, value:"Active"},
{ id:1, value:"Finished"}
]}
];
var list = {
view:"list", id:"list", borderless:true, autoheight:true,
type:{ height:55, width:800 },
data:[{ value:"Test data"}]
};
app = {};
app = {};
app.ui = {
container:"app_area",
paddingX:20,
rows: [
{ paddingY:20, cols:toolbar },
list
]
};
Nothing complicated, so far. We are creating a toolbar with two buttons. One is a common button for adding new records, the other one is a segmented button for selecting the items we want to see. To align the left and the right buttons along the left and the right border respectively, we are adding one empty placeholder between buttons. It doesn’t have any fixed width, so it will take all free space between the buttons.
Also, we are creating a list view, which will hold all todo records. For now, it doesn’t contain any logic.
As you can see, instead of placing all elements inside of a single json structure, we have defined different parts as separate variables and later have joined them in a single app.ui structure. Such an approach allows simplifying the ui creation, as you can work with relatively small code blocks, instead of with a single mega structure.
Here and later, to check the results you can open index.html in a browser (be sure to open it by http).
Adding Dynamic
Let’s start from “Add new Task” button. First, we need to create a js code which will do the adding logic. It is quite simple (here and later all js code goes to the app.js file):
//add new element to the start of list
var id = $$("list").add({
done:-1,
task:"TODO"
}, 0);
//resize list to fit all elements
$$("list").resize();
}
and to attach this action to the button, let’s modify the button’s code like that:
click:add_task },
If you check index.html in a browser – pressing “add” button now must add a new record to the list.
Let’s continue and add the ability to mark an item as done. The same as in the above case, we need to add the function which will hold the logic of operation first:
$$("list").getItem(id).done = 1;
$$("list").updateItem(id);
}
After that, let’s specify the look of the list for active and closed tasks respectively. Appearance of the list can be changed through template, which can be a string or a function. We will use the second approach:
view:"list", id:"list", borderless:true, autoheight:true,
type:{
height:55, width:800,
active:"<div class='todo_check'><input type='button' value='Finish'></div>",
closed:"<div class='todo_check_done'> Done </div>",
template:function(obj, common){
var active = (obj.done == -1);
if (active)
return common.active + obj.value + common.drag;
else
return common.closed + obj.value;
}
},
onClick:{
"todo_check" : mark_task
}
};
Besides the template updating, we have added the “onClick” configuration block, which instructs the list to call “mark_task” function each time, when we are clicking on an element with “todo_check” css class.
Now, if you open “index.html’ in a browser, you will be able to add a task and mark it as “done”, by clicking on “finish” button.
The last step, which needs to be done – to show only active or completed tasks, depending on the segmented button state. To do it, let’s create one more function:
function list_filter(obj){
var val = $$('selector').getValue() || -1;
$$('list').filter(function(obj){
return obj.done == val;
});
$$('list').resize();
}
To apply this code each time, when the state of the segmented button is changed, we need to modify the code of the segmented button:
{ id:-1, value:"Active"},
{ id:1, value:"Finished"}
],
on:{ onChange : list_filter }
}
also, to apply the filtering rules, after the state of an item changes, let’s adjust “mark_task” function, as well:
$$(“list”).getItem(id).done = 1;
$$(“list”).updateItem(id);
list_filter();
}
Now, the list of items reflects the state of the segmented button. The list shows only active or only closed tasks, depending on the selected button.
Data persistence
So far, we lose all data after each refresh, which is quite frustrating. Let’s fix it. As we don’t have any server side code, let’s save data to the localStorage (browser based storage, which is available in all modern browsers):
$proxy :true,
load:function(view, callback){
view.parse(webix.storage.local.get("data"));
},
save:function(view, data){
webix.storage.local.put("data", view.serialize(true) );
webix.dp(view).reset();
}
};
That is an object, which will handle all data operations. It has two methods: “save” will be called, when we will need to save data. It will serialize current data and will store them in local storage; “load” will be called during data loading, and will return the previously stored data.
Such a storage can be easily attached to the “list” component:
view:"list", id:"list", borderless:true, autoheight:true,
// ... skipping the list's config ...
ready: list_filter,
url: data_proxy,
save:data_proxy
};
The above code instructs the list to load and save data through the storage object ( which will result in storing and loading data through local storage ). Also, we instruct the list to call “list_filter” after the initial data loading.
Try to open “index.html” in a browser. From now on, all the tasks you will add and their state will be preserved after page reloading.
Edit tasks
Final thing which needs to be done – item’s editing. We can add and mark items, but we can’t change their text. Webix provides a way to assign editors for different components. For some of them ( datatable and tree ) this functionality is built in, for others, it requires an extra step.
As “list” doesn’t support editing operations by default, we need to define our own component, based on list, but with editing ability.
name:"editlist"
}, webix.EditAbility, webix.ui.list);
Now we can adjust the code of the list’s control in the next way:
view:"editlist", id:"list", borderless:true, autoheight:true,
// ... skipping the list's config ...
editable:true, editor:"text"
};
We have changed the view:”list” to our own component view:”editlist” and added two configuration options – to enable editing and to define the editor’s type.
Check the page in a browser – now you will be able to open editor by dblclicking on any item on the list. You can close editor by clicking somewhere on the page or by pressing Enter or Escape keys ( to confirm or cancel the editing respectively). Results of editing will be automatically saved and will be shown again after page refreshing.
To make it work a bit more useful, let’s add two more event handlers. One will block edit operations for the closed task, the second one will delete the tasks with empty text:
view:"editlist", id:"list", borderless:true, autoheight:true,
// ... skipping the list's config ...
on:{
//disallow edit for finished tasks
onBeforeEditStart:function(id){
if (this.getItem(id).done == 1)
return false;
},
//delete empty task
onAfterEditStop:function(state, editor){
if (state.value == "")
this.remove(editor.id);
}
}
};
Now, the main functionality of our app is complete.
Drag-n-drop
While we already have a fully working “todo” list, let’s add one more feature – reordering by drag-n-drop. While working with common html, it can be not so very simple task, but webix provides a ready to use solution, which needs to be just configured a bit:
view:"editlist", id:"list", borderless:true, autoheight:true,
// ... skipping the list's config ...
on:{
// ... skipping the list's config ...
//save data after reordering
onAfterDropOrder:function(id){
webix.dp(this).save(id);
}
},
drag:"order"
“drag” option will enable drag and drop. Its value, “order”, will instruct the list to use drag-n-drop only for reordering. Extra event handler will force data saving after drag-n-drop operation’s end.
Looking behind and ahead
While going through the above steps, we have created a simple “todo” app. It may look as a lot of code, but actually it has taken less than 100 lines of code to build the app. That is the power of Webix – get more functionality with less coding. Webix allows focusing on description of the app’s functionality, instead of working with raw HTML and inventing custom solution for each task.
As you can see, Webix is not just a set of predefined components. It also contains a lot of building blocks for common functionality, such as data saving, editing, drag-n-drop and etc. If the existing components do not suit for your needs, it is possible to create your own ones through the arrangement of the existing blocks of functionality.


