Bots are around us. Some of them are good and they help us in everyday tasks, but some are evil and attempt to steal our information. If you are familiar with web development and forms, in particular, you may have faced certain security issues like abusive form input from bots. Measures need to be taken to make your website or web application safer, and using reCaptcha is one of them. Despite Webix does not offer such a widget of its own, there is a solution to it.
Let’s take a closer look at this way of protecting websites and web applications from spam and abuse. I will not discuss the server side of reCaptcha validation in the article, I will only show you the client side logic.

Why reCaptcha?
By adding reCaptcha v2 to a site, you can block automated software while helping your welcome users to submit their input with ease. This version of reCaptcha launched by Google in 2014 doesn’t require form visitors to type anything (looking at those nasty pieces of distorted text) into a validation field. Now they simply have to check a box, while the system verifies whether the user is a human or not with some clues, for example, such as mouse movements within the reCaptcha area. Only if it registers something suspicious, users will have to pass some additional validation.
How to use reCaptcha in a common HTML form
Let’s start our journey to adding reCaptcha to a webpage. It’s pretty easy, and first of all you need to get the keys for your web site on the official site.
Registering the domain on reCaptcha site
- You need to be logged into your Google account to sign up for a key pair. This pair consists of a site key and a secret key. You will need the site key to invoke reCaptcha service on the client side of your application. The secret key will be necessary for server-side JavaScript captcha validation.
- Then you are to choose the type of reCaptcha among the three options – v2, invisible, or Android Library – and fill in authorized domains or package names. Let’s choose reCaptcha v2.
- After you accept the terms of service, you can click Register button to get your key pair.
Voila, you’ve completed the first step. Now you can add some code to your page.
Adding JS and HTML code to a page
Rendering reCaptcha v2 requires only two lines of HTML.
<script src='https://www.google.com/recaptcha/api.js'></script>;

As you can see, all you need to do is include the necessary JavaScript resource and a div element with the class name g-recaptcha. You are to put your site key in the data-sitekey attribute.
Adding ReCaptcha to Webix Form, naive implementation
However, it isn’t so easy to add a working reCaptcha if you create web apps with Webix. You cannot just put it in the form like we did in the previous section because there is no such view as “captcha”. There is a straight solution to it, and in this section, we will show you how to validate captcha in JavaScript.
width: 340, rows:[
{ view:"form", elements:[
{ view:"text", label: "Name", name:"name" },
{ view:"text", label: "Email", name:"email" },
{ id:"capcha" },
{ view:"button", value:"Register", click:function(){
$$("out1").setHTML( JSON.stringify(this.getFormView().getValues()) );
}},
{ view:"template", id:"out1" }
]}
]
});
window.grecaptcha.render($$("capcha").$view, {
sitekey:"6LcOjCUUAAAAADvFhArNTzH4-3psPpbJS8dKcReL"
});
This is how our form looks like:
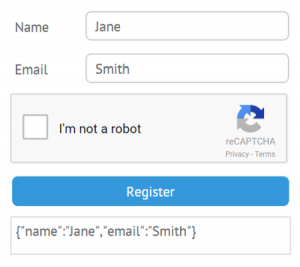
As you can see, here we create a form, populate it with controls and create an empty view for reCaptcha with id:”capcha”. Then we invoke ReCaptcha’s method render with that empty “capcha” view as a container parameter and an object with the site key as the second parameter. It successfully renders reCaptcha, but it still doesn’t serve any purpose, because users can submit the form input with or without checking reCaptcha.
The first step to solve this problem is to create a special reCaptcha view on the basis of webix.ui.view. This is how we do it.
name:"recapcha",
$init:function(){
this.$ready.push(function(){
window.grecaptcha.render(this.$view, {
sitekey:"6LcOjCUUAAAAADvFhArNTzH4-3psPpbJS8dKcReL"
});
})
}
}, webix.ui.view);
Here we define a new recaptcha view with the help of a custom control method so that the render method would be invoked during the initialization of the reCaptcha. Besides, we give it a name.
After we defined the view, we are free to place it into our form.
width: 340, rows:[
{ view:"form", elements:[
{ view:"text", label: "Name", name:"name" },
{ view:"text", label: "Email", name:"email" },
{ view:"recapcha" },
{ view:"button", value:"Register", click:function(){
$$("out1").setHTML( JSON.stringify(this.getFormView().getValues()) );
}},
{ view:"template", id:"out1" }
]}
]
});
This solution is better than the previous one because now we don’t need to trace the moment of the initialization of the form and invoke render strictly after it.
Still, reCaptcha doesn’t interact with the submission button, so this is not the solution we seek for.
Adding ReCaptcha as a fully fledged widget
Finally, here is the good news, this is a final step before our solution.
First of all, we add getValue function, that will get the value of reCaptcha’s response out of its hidden textarea, and give a name to the control.
name:"recapcha",
//other code
getValue:function(){
return this.$view.querySelector("textarea").value;
},
//other code
defaults:{
name:"g-recaptcha-response",
//other code
}
}, webix.ui.view);
Now we have a working reCaptcha that just needs some styling.
It’s time to add all other updates to polish the final widget.
name:"recapcha",
$init:function(){
this.$ready.push(function(){
var key = this.config.sitekey;
window.grecaptcha.render(this.$view, {
sitekey:key
});
})
},
getValue:function(){
return this.$view.querySelector("textarea").value;
},
setValue:function(){ /*do nothing*/ },
focus:function(){ /*do nothing*/ },
defaults:{
name:"g-recaptcha-response",
borderless:true,
height: 85
}
}, webix.ui.view);
Here, we add the sitekey property into the definition of the “recapcha” view. Besides, we define additional methods – setValue and focus. In the above code, they are empty. They allow the “recapcha” view to be treated just like the rest form controls. Finally, we give two more default properties to our new widget for a nicer look.
Now we are ready to put it into the form.
width: 340, rows:[
{ view:"form", elements:[
{ view:"text", label: "Name", name:"name" },
{ view:"text", label: "Email", name:"email" },
{ view:"recapcha", sitekey:"6LcOjCUUAAAAADvFhArNTzH4-3psPpbJS8dKcReL" },
{ view:"button", value:"Register", click:function(){
$$("out1").setHTML( JSON.stringify(this.getFormView().getValues()) );
}},
{ view:"template", id:"out1" }
]}
]
});
There is a slight change in this piece of code, because we assign our site key to the newly created sitekey property during initialization.
Eventually, this is the solution we wanted.
Conclusion
In this article, we’ve discussed the process of integrating reCaptcha v2 into the Webix Form. Now you see that creating web applications with Webix and being able to protect it with reCaptcha isn’t so complex. You just have to add a few lines of code, and you’ll have a fully functioning reCaptcha widget on your page.
ReCaptcha v2 is not the only technique for weeding out bots. Google created other versions that were briefly mentioned – the invisible reCaptcha and Android Library reCaptcha for mobile apps. Besides, there is also an “irresistible honeypot” for that, which seems pretty good. For more information, you can visit the guide to reCaptcha provided by Google.


