With Webix you can also follow the TypeScript pattern and enjoy all the benefits of static typing from hints on methods’ usage during development to stable applications in the long run. The article below will tell you how to do it.
Typescript invites Javascript frameworks to enter its environment with the help of type declaration files that should be provided by a framework. A lot of popular libraries provide declaration files, and for your convenience Webix declaration file is included right in the package.
Getting Started
Webix type definitions of widgets, mixins interfaces and the correct parameters for their properties and methods are stored in the webix.d.ts declaration file, which is included in the main Webix package. You need to include webix.d.ts into your TypeScript application.
For npm users the basic algorithm of working with TypeScript presupposes the following steps:
- Installing TypeScript on the local machine:
npm install -g typescript
- Preparing the “tsconfig.js” file where the source and declaration files should be specified:
{ "files": [ "webix.d.ts", "app.ts" ] }
- Writing Typescript code in the “app.ts” file
- Compiling this code in a command shell:
tsc app.ts
- Including the compiled “app.js” file into your project.
But we will move to a higher level and create a demo TypeScript+Webix application built with webpack module bundler.
Creating a Demo App
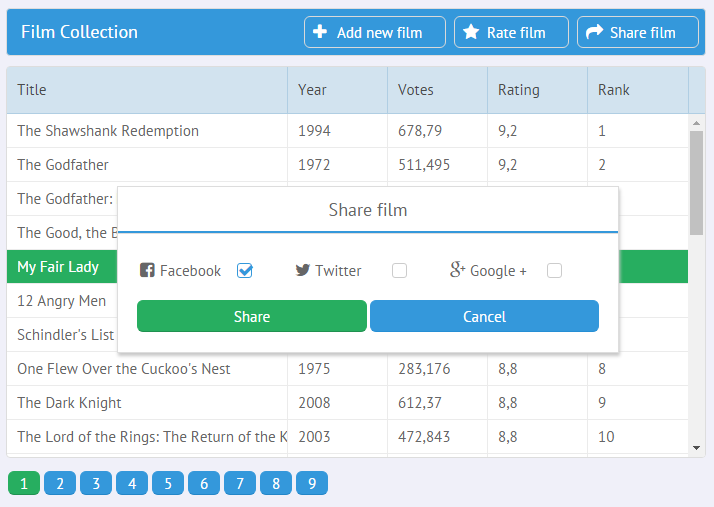
Let’s create a simple application with a Datatable containing a list of films and a toolbar with buttons. The buttons will invoke windows to maintain user actions on this films’ list.
Preparing the environment
We will use the Awesome TypeScript loader for webpack and webpack-dev-server to run our mini project. We will get them via npm package manager alongside with Webix, TypeScript and other dependencies. Here’s the full structure of our project:
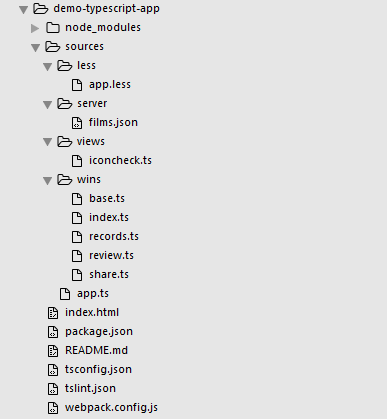
You can clone the demo from GitHub and follow the story with an eye in the source code. To launch the demo locally, just run the commands below:
npm run codebase;
And open the live demo at localhost/demo-typescript-app/index.html.
To enable dev server and watch the code changes at runtime, execute the following commands:
npm run server;
And open the demo at the localhost:8080.
Firstly, let’s tune the “tsconfig”.json file to connect Webix webix.d.ts file and application .ts files.
"files":[
"sources/**/*.ts",
"node_modules/webix/webix.d.ts"
]
Secondly, let’s enable exporting of .ts files into .js ones:
module.exports = {
entry: {
"app":pkg.app.replace(".js", ".ts")
},
output: {
path: path.join(__dirname, 'codebase'),
publicPath:"/codebase/",
filename: '[name].js'
},
module: {
rules: [
{ test: /\.ts$/, loader: 'awesome-typescript-loader' }
]
}
};
Thirdly, let’s create an “index.html” file. In this file we will link to Webix JS and CSS files, as well as to compiled application JS and CSS files:
<html>
<head>
<title>Films app</title>
<script type="text/javascript" src="./node_modules/webix/webix.js"></script>
<link rel="stylesheet" type="text/css" href="./node_modules/webix/webix.css">
<link rel="stylesheet" type="text/css" href="./codebase/app.css">
</head>
<body>
<script type="text/javascript" src="./codebase/app.js"></script>
</body>
</html>
Structuring the application
Now we can start coding the project itself. The main application logic is implemented within the App class while interactive windows are managed in a separate module.
import * as wins from "./wins/index";
import "./less/app.less";
class App {
init(): void {
const layout:webix.ui.layout = this.createLayout();
const grid:webix.ui.datatable = layout.getChildViews()[1];
this.createDialogs(grid);
}
createLayout():webix.ui.layout {
return <webix.ui.layout> webix.ui({
rows:[
toolbar,
datatable,
pager
]
});
}
createDialogs(grid:webix.ui.datatable): void {
wins.init(grid);
}
openDialog(action:string):void {
wins.open(action);
}
}
const app = new App();
app.init();
As you can see, the application is rather simple. There is the main layout and a number of interactive windows that are created initially. Then, on clicking a toolbar button, the openDialog() method opens the related window.
But since we are interested in variable typing, let’s pay attention to Webix specific types.
Setting Widget Types
To instantiate a widget with the webix.ui() constructor, you need to explicitly state its type as <webix.ui.{widget}>, otherwise the compiler will interpret is as webix.ui.baseview and will not recognize its methods and events as correct.
rows:[ toolbar, datatable, pager]
});
const window = <webix.ui.window> webix.ui({
head:"My window",
body:{ … }
});
To set a type for a particular child view and ensure that it uses proper methods and events, you can provide the same statement at runtime:
//or
const grid:webix.ui.datatable = layout.getChildViews()[1];
grid.add({ title:"New film"}, 0);
Or, this notation can be used when accessing any Webix widget by its ID:
Setting Widget Types:Use Case
Let’s declare the Dialog class for managing all application windows. It contains the logic for common actions with all windows like creating, opening and closing.
export class Dialog{
dialog:webix.ui.window;
form:webix.ui.form;
grid:webix.ui.datatable;
constructor(grid:webix.ui.datatable){
this.grid = grid;
}
init():void {}
oninit():void {}
apply():void {}
onshow():void {}
onhide():void {
this.form.clear();
}
open():void{
if(!this.dialog){
this.dialog = <webix.ui.window> webix.ui(this.init());
this.form = this.dialog.getBody();
this.dialog.attachEvent("onHide", ()=>this.onhide());
this.dialog.attachEvent("onShow", ()=>this.onshow());
this.oninit();
}
this.dialog.show();
}
close():void{
webix.UIManager.setFocus(this.grid.config.id);
this.dialog.hide();
}
getButtons(ok:string, cancel:string):webix.ui.layoutConfig{
return { cols:[
{ view:"button", value:ok, type:"form", click: () => this.apply() },
{ view:"button", value:cancel, click: () => this.close() }
]};
}
}
The class properties describe the main application widgets: the current dialog window, the form inside it and the main datatable. Since the properties are typed with the corresponding widget types:
form:webix.ui.form;
grid:webix.ui.datatable;
the compiler checks all their methods that are called in the application and all the events that are attached to them, e.g.:
this.dialog.attachEvent("onHide", ()=>this.hide());
The same works well in the child DialogBox class that is responsible for each particular application window:
import {Dialog} from "./base";
export class DialogBox extends Dialog{
init(){ /*returns a window with a form in its body*/}
onshow(){
(<webix.ui.text>this.form.elements.title).focus();
}
apply(){
if(this.form.validate()){
const values = this.form.getValues();
this.grid.add(values, 0);
this.close();
}
}
}
You can safely call the methods of this.form and this.grid as their types are set in the parent class. But to safely focus the desired form element we should state its type as:
Typing Widget Configuration
With TypeScript definitions you can get rid of errors caused by incorrect widget parameters as well. The related webix.ui.{widget}Config interfaces can strictly control the parameters you provide for the widgets as well as their values:
view:"datatable", id:"filmsdata",
editable:true, editaction:"dblclick",
autoConfig:true, url:"sources/server/films.json",
pager:"pagerA",scrollX:"false"
};
const pager:webix.ui.pagerConfig = {
view:"pager", id:"pagerA",
group:10, size:30
};
const layout = <webix.ui.layout> webix.ui({
rows:[ datatable, pager]
});
Although such typing is optional, it enhances safety and stability of your project.
Creating a Custom Webix Widget with Strict Typing
For this demo application I required several checkboxes with an icon in their label. To avoid code repetition I decided to create a custom IconCheck widget with this functionality in the prototype:

import "../views/iconcheck";
...
{ view:"iconcheck", name:"fb",icon:"facebook-square",label:"Facebook"}
{ view:"iconcheck", name:"twitter", icon:"twitter", label:"Twitter"}
Basically, all I had to do is to inherit from webix.ui.checkbox and add a method to get the HTML string for my icon label:
name:"iconcheck",
$init:function(config){
config.label = this.getIconLabel(config.icon, config.label);
config.labelWidth = 100;
},
getIconLabel:function(icon, label){
return "<span class='webix_icon fa-"+icon+"'></span>"+label;
}
}, webix.ui.checkbox);
Creating of custom widgets is described in Webix documentation in detail, but in this article we are interested in how to achieve the same while preserving all type definitions. Let’s look into the “views/iconcheck.ts” file.
To justify the icon property within the configuration of the IconCheck widget, we need to declare the corresponding interface that extends from the related config interface of the basic widget:
icon?:string;
}
To add or override methods and properties in the prototype, we need to define an API interface and a view interface that extends from the basic view:
name:string;
$init(config:IconCheckConfig):void;
getIconLabel(icon:string, label:string):string;
}
interface IconCheckView extends webix.ui.checkbox, IconCheckApi {}
And, finally, we need to provide the necessary API to create a new proto UI. In our case it is a custom widget called “IconCheck”:
name:"iconcheck",
$init:function(config){
config.label = (<IconCheckView>this).getIconLabel(config.icon, config.label);
config.labelWidth = 100;
},
getIconLabel:function(icon, label){
return "<span class='webix_icon fa-"+icon+"'></span>"+label;
}
};
webix.protoUI(api, webix.ui.checkbox);
Rich Coding Experience
The presence on the “tsconfig.json” file in the project root folder enables such awesome feature as Webix code completion and hinting right in the IDE. Impressed? So, now it’s your turn to work on the TypeScript project, and may all the above instructions help you.
To cut a long story short
The full code of the described demo is available on GitHub while the live demo is hosted nearby.
The current Webix TypeScript declaration file contains definitions for Webix 4.2. It is updated with each major update to ensure safe typing for your projects.
Does anyone already use Webix with TypeScript? Feel free to share your experience in the comments, and you will do a big favor to the whole Webix community. See you in the new Webix 4.3 reality!

