This is a guest post by Dragos Stoica.
The initial task
My objective was to design and implement a simple application allowing me to manage my freelance business. The application is called iFact and is available on github. The basic activity consists in getting contracts with clients, performing the work or service and invoicing the client. Also, I needed to manage the invoice flow and to have a minimal dashboard for cash flow control. The volume of invoices is low: from one to a couple of invoices per month. The number of clients and contracts per client is low, it means 5 to 10 clients with 1-3 contracts per client, normally one single contract active at any given moment in time.
The primary entities are:
- supplier or service provider – your data
- a list of clients
- one or more contracts per client
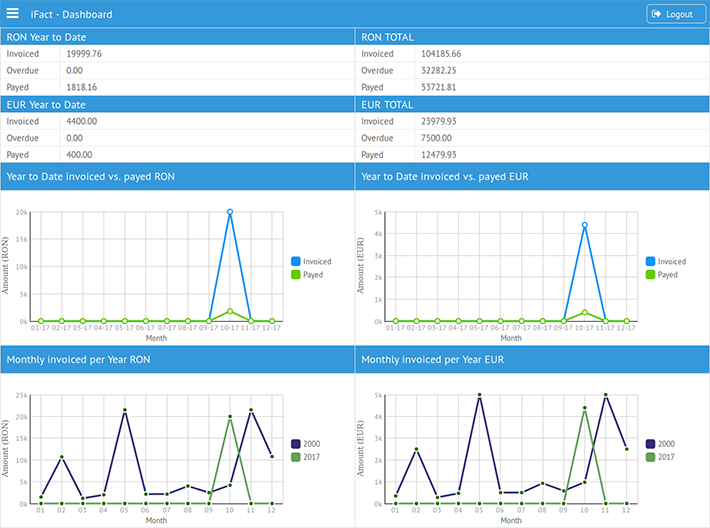
An invoice will combine the data from supplier, client and invoice details into one single PDF document. The life cycle of an invoice is new, due and paid. This can be monitored inside the application. The dashboard section allows you to have an overview of the cash flow (invoiced vs. paid) and to compare monthly invoiced sums for each year. Also, you can export in Excel the data in order to further process and analyze the data.
The criteria for choosing a UI library
From the beginning I aimed for a Single Page Web application that can be fully described in JSON format, no CSS or extra HTML. I searched for an out of the box fully functional framework, including: programmatic widget control, data processors, server-side integration, AJAX capabilities, and, most importantly, support, documentation, and code examples. I found only a couple of such frameworks: DHTMLX and Webix were up to the task. Webix was much better-suited for my needs.
Webix was also a better choice because of the Proxy component. I used CouchDB as a web server and database so the communication with the server side had to be customized. Integrating external libraries, such as PDFMake and SheetJS, was direct and natural. I do bly recommend Webix as the first choice for new web applications. For me, developing with Webix was fun, easy and rewarding. Getting almost instant result in a couple of lines of code is unbeatable.
Development process and challenges
The architecture is two-tier: Single Page Web application for the front end served from CouchDB which is both web server and NoSQL database. The communication mechanism is exclusively based on AJAX, this implies no page reloads.
The first challenge was to write the custom Webix Proxy allowing the communication with CouchDB server or similar, like IBM Cloudant. The CouchDB web server exposes the database via the REST API. Basic GET, PUT, POST, DELETE HTTP requests can be used to manipulate data. It is a NoSQL document oriented database that stores the information in JSON format.
Here’s my proxy for CouchDB created with webix.proxy. The response from CouchDB may be used for DHTMLX components as well. It was tested with DHTMLX Scheduler.
$proxy: true,
//loading and saving patterns
//...
};
The read operation from database is done via GET requests and the data is extracted from CouchDB via map-reduce functions called views. Views are written in JavaScript and stored as JSON documents inside CouchDB – those are called design documents. Here’s how I defined the loading pattern:
load: function(view, callback) {
webix.ajax(this.source, callback, view);
}
I send a GET request to database/design_document/_list/[list_name]/[view_name]. This can be the url attribute of the widget or load string. The response from the server is an array of objects.
The insert and update operations are done via POST and processed by updates functions inside design documents. There are no delete operations in the application, but they can be handled in the same way as inserts and updates.
One important piece of information that has to be kept in sync between Webix and CouchDB is document’s _id and _rev fields. Those are special fields that are needed for all update operations. You may notice that after creation and modification of a document those special fields are updated before sending the data to the UI component.
So, this is the Save data pattern for update operations:
if (update.operation == "update") {
webix.ajax().header({
"Content-type": "application/json"
}).post(dp.config.url.source + "\/" + update.data._id, //your data must contain _id
JSON.stringify(update.data), [function(text, data, xhr) {
var msg = data.json();
if ('action' in msg) { //the response will contain an action field
var item = view.getItem(update.data.id);
item._rev = xhr.getResponseHeader('X-Couch-Update-NewRev'); //getting _rev property and setting the value at data level
view.updateItem(update.data.id, item);
view.refresh();
}
}, callback]
);
}
}
The address is present as the save attribute of the widget and it points to an update function in a CouchDB design document. Update implies that the document exists in CouchDB and must have attributes _id and _rev, those are stored in the widget data also as hidden fields.
Insert operation is equivalent with creation of a new document in CouchDB. We must get back _id and _rev of the newly created document for further update operations. Have a look at the pattern for inserts:
if (update.operation == "update") {
/* update */
}
if (update.operation == "insert") {
webix.ajax().header({
"Content-type": "application/json"
}).post(dp.config.url.source,
JSON.stringify(update.data), [function(text, data, xhr) {
var msg = data.json();
if ('action' in msg) { //the response form CouchDB will contain action field
var item = view.getItem(update.data.id);
item._id = xhr.getResponseHeader('X-Couch-Id'); // getting the _id attribute from the response and adding it to the data of the widget
item._rev = xhr.getResponseHeader('X-Couch-Update-NewRev'); //getting _rev property and value for it at data level
view.updateItem(update.data.id, item);
view.refresh();
}
}, callback]
);
}
}
An example for a widget:
view:"activeList",
id:"customersList",
...
url: "CouchDB->../../_design/globallists/_list/toja/customer/getcustomer",
save: "CouchDB->../../_design/customer/_update/rest"
}
The design document _design/customer/_view/getcustomer containing the view – the map function, this will be called with GET and is the load part of the Proxy:
if (typeof doc.doctype !== 'undefined' && doc.doctype == "CUSTOMER") {
emit(null,doc);
}
}
The design document _design/globallists/_list/toja containing the list – transforming the result of the view in an array of objects:
// specify that we're providing a JSON response
provides('json', function() {
// create an array for our result set
var results = [];
while (row = getRow()) {
results.push(row.value);
}
// make sure to stringify the results :)
send(JSON.stringify(results));
});
}
The design document _design/customer/_update/rest the update function – performing the insert and update operations, delete is also implemented here but not used. This is called by save part of the Proxy and a POST will be emitted.
The request method will determine the action:
- PUT: Update existing doc
- POST: Create new doc if doc._id is not present, or Update an existing document if doc._id is present
- DELETE: Delete existing doc, CouchDB way 😉
The main part of the response (JSON):
action: 'error' | 'created' | 'updated' | 'deleted',
doc: new_doc
}
And here’s the update function itself. If the request type is PUT:
var payload = JSON.parse(req.body);
var fields = [ 'nume', 'NORG', 'CUI', 'TVA', 'adresa', 'banca', 'sucursala', 'IBAN'];
if(req.method == "PUT"){
//update document
fields.forEach(function(elm, idx){
doc[elm] = payload[elm];
});
return [doc,JSON.stringify({"action":"updated","doc":doc})];
}
//...other request types
}
If the request type is POST, the existing document will be updated and if nothing is found, a new one will be created:
if(doc === null){
//Create new document
var newdoc = {
_id: req.uuid,
doctype: "CUSTOMER"
};
fields.forEach(function(elm, idx){
newdoc[elm] = payload[elm];
});
return [newdoc, JSON.stringify({"action":"created", "sid":req.id, "tid":req.uuid, "doc":newdoc})];
}else{
//Update existing document
fields.forEach(function(elm, idx){
doc[elm] = payload[elm];
});
return [doc, JSON.stringify({"action":"updated", "sid":req.id, "tid":req.uuid, "doc":doc})];
}
}
If the request type is DELETE, the deleted document is kept in history and may be ‘undeleted’:
if(req.method == "DELETE"){
doc._deleted = true;
return [doc, JSON.stringify({"action":"deleted"})];
}
...
And, finally, for unknown requests it sends error with request payload:
return [null, JSON.stringify({"action":"error", "req":req})];
//end of function
Check out the complete code on GitHub.
This was the major challenge that I had to deal with. The rest of the application is based on Webix samples and documentation. A great thank you for the work done here by the Webix team!
From technical point of view, the application is hosted and served from a design document inside CouchDB. The deployment process consists in creating a design document called app and attaching all the necessary files to it. This can be done in a straightforward manner using ACDC tool. The deployment of iFact was done 100% with this tool. This way one can have both the application and data served from the database.
The app
Prerequisites:
- install CouchDB and configure an admin user,
- get ACDC tool in order to deploy the iFact application,
- a web browser: Firefox, Chrome or Safari.
If you deploy it on the localhost, the most common address where you will find the application is:
And you should get the login screen. In order to authenticate, please use the CouchDB username and password.

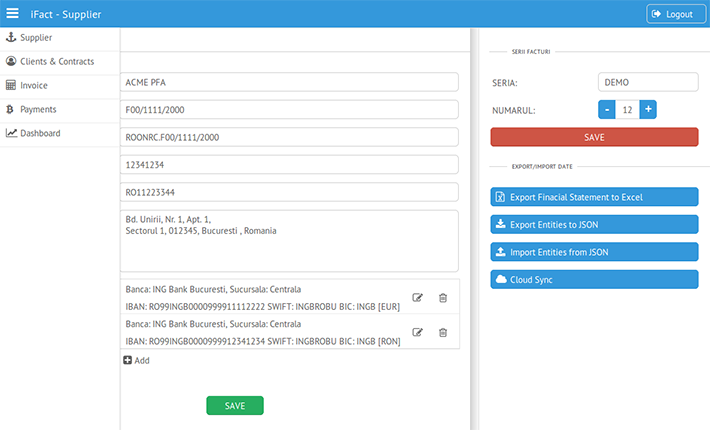
The landing screen presents your information – The Supplier:
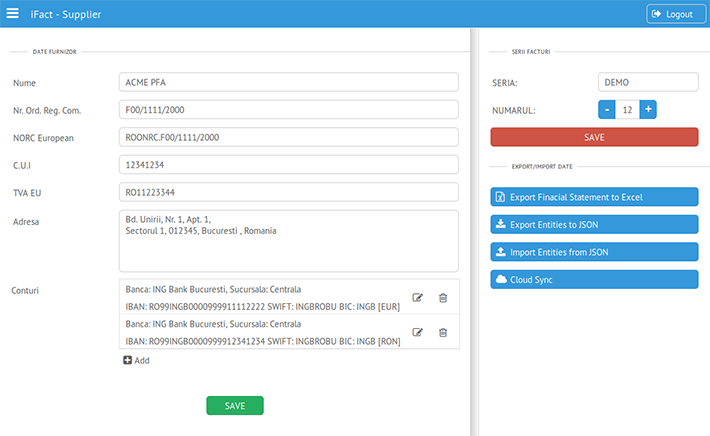
There is basic legal and fiscal information that is necessary for invoicing and getting paid. On the right side of the screen there is the invoice counter and some administrative functions: export all data as JSON, import data from JSON and synchronize with another instance like Cloudant. Also you can export the financial statement in Excel.
On the top left you will find a drawer menu that allows you to navigate to other pages.
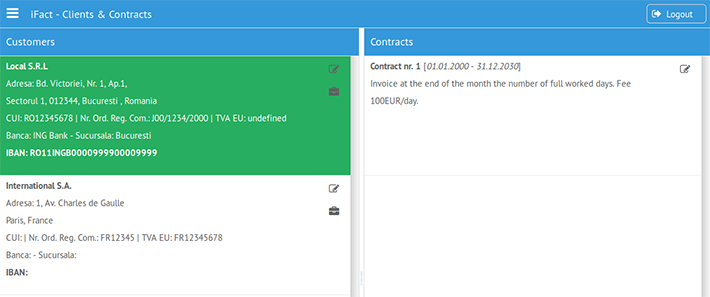
Next you will find the Clients and Contracts page that will allow you to manage the list of Clients and their associated Contracts.
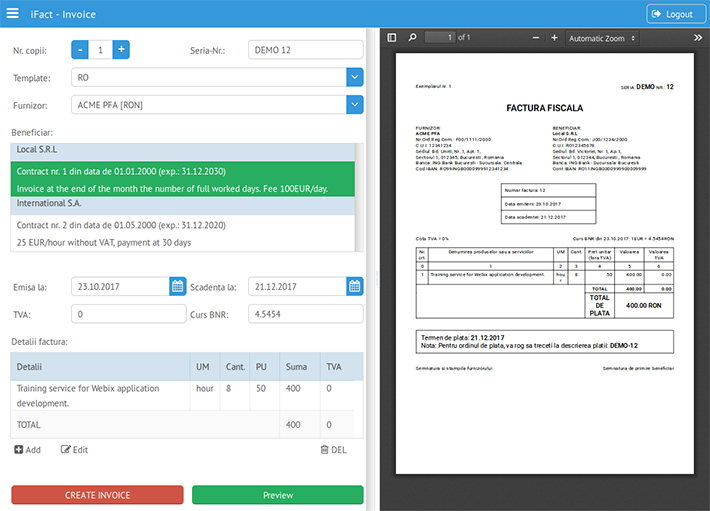
The main purpose of this application is to produce invoices, so on the next page we will find the appropriate interface. You may choose a template, the supplier bank account, the client, enter invoice details and preview the invoice before issuing it.
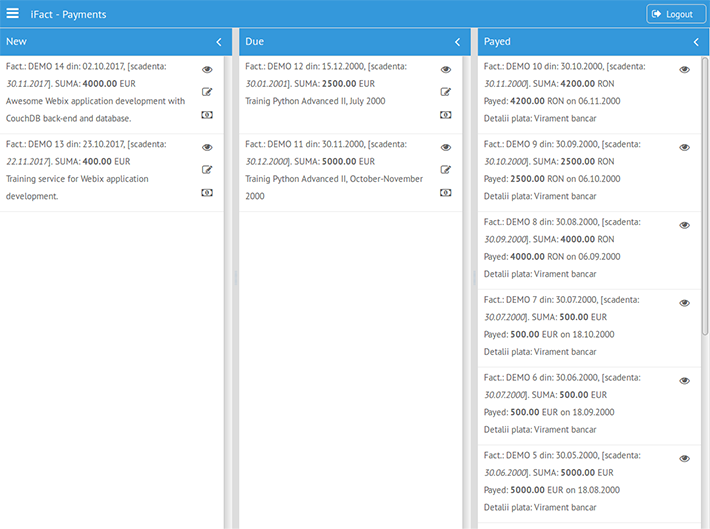
The newly created invoices will enter the New-(Due)-Payed life cycle. You can trace your invoices in the Payments view.
The Dashboard view allows you to see how your business is performing and the cash flow.
Other Webix-based projects
I found Webix a couple of years ago. Before this project, I already have used Webix in a couple of small projects: microKanban, Sales Representative Manager, designEditor and as a teaching material at university for undergraduate CS engineers. All projects are open source and can be found on https://github.com/iqcouch
If you like working with Webix and want to contribute to the community, we are more than delighted to get you on our github team. We also have projects based on Go, Framework7 (mobile), PhoneGap/Cordova, and Java.

