Kanban boards allow visualizing the workflow in an easy and intuitive way. And Webix has a tool that allows you to create your own Kanban Board.
There’s already a well written guide that describes how you can use the Webix Kanban Board widget. This time we’ll take a look at some tips and tricks you can use to customize the existing project management application.
Splitting the Columns
First of all, the basics. Here’s how you can create a simple Kanban Board:
view:"kanban",
type:"space",
//the structure of columns on the board
cols:[
{ header:"To Do",
body:{ view:"kanbanlist", status:"new" }},
{ header:"Estimated",
body:{ view:"kanbanlist", status:"estimated" }},
{ header:"In Progress",
body:{ view:"kanbanlist", status:"work" }},
{ header:"Done",
body:{ view:"kanbanlist", status:"done" }}
],
//URL to the file with data collection
url: "tasks.php"
});
And here’s the result:
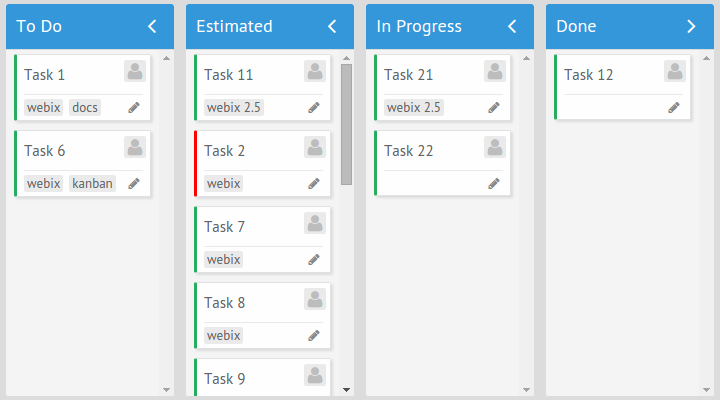
If you saw a Kanban board before, this one may be familiar to you. A couple of columns and a bunch of cards that represent the tasks. But the good news is that Webix provides you with the possibility to redefine this default appearance.
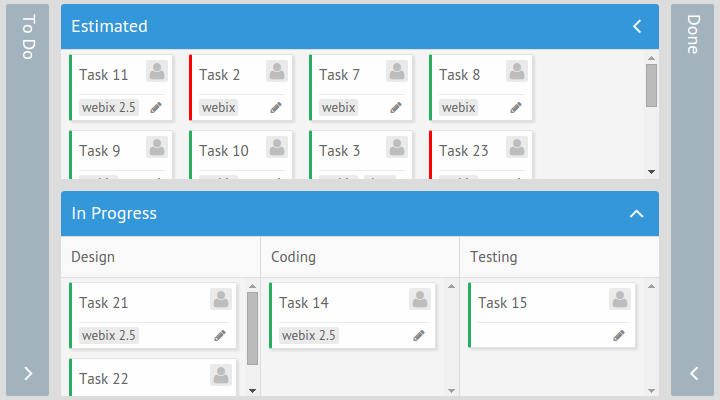
Imagine that one of your development stages has its own complex structure. To visualize it you can split the existing column. For example, let’s split the “In Progress” area:
body:{
cols:[
{
rows:[
{template:"Coding", height:40, css:"sub_header"},
{view:"kanbanlist", status:"coding"}
]
},
{
rows:[
{template:"Testing", height:40, css:"sub_header"},
{view:"kanbanlist", status:"testing"}
]
}
]
}
}
Here’s what we’ve made here. Since “In Progress” is bigger now, it’s a good idea to change its relative size using the gravity property. Check this page to see how this property works. After that, we’ve defined the body structure for this area of the board. Now it consists of two columns, and each of them has two rows. The first row is a header. To create a header we’ve used the Template widget. And here’s another opportunity to customize your application. Notice this css:”sub_header” property. You can use your own style with it. In this case, the sub_header CSS class will be used to change the style of the header.
Here’s how our board looks like now:
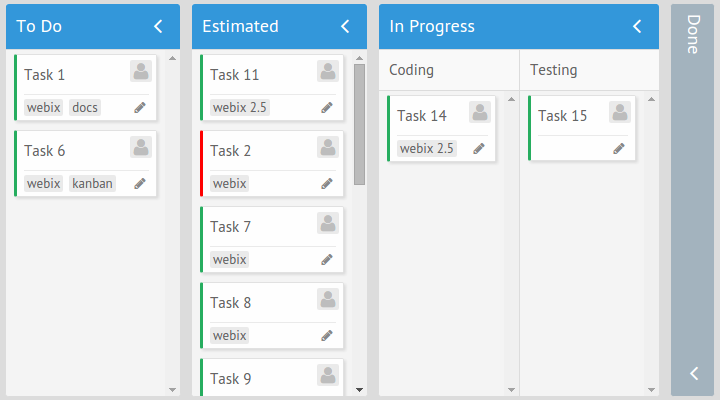
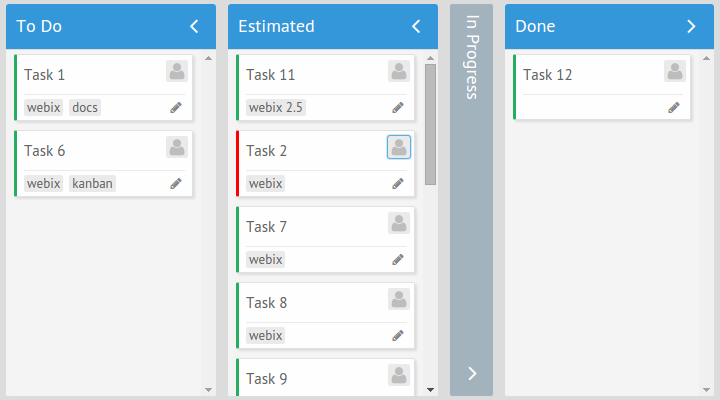
Using this approach you can group the similar types of development stages into the single column. Now you can collapse the whole “In Progress” column in one click, which can be useful if it consists of dozens of phases and you’re not interested in this part of your project:
Changing the Structure
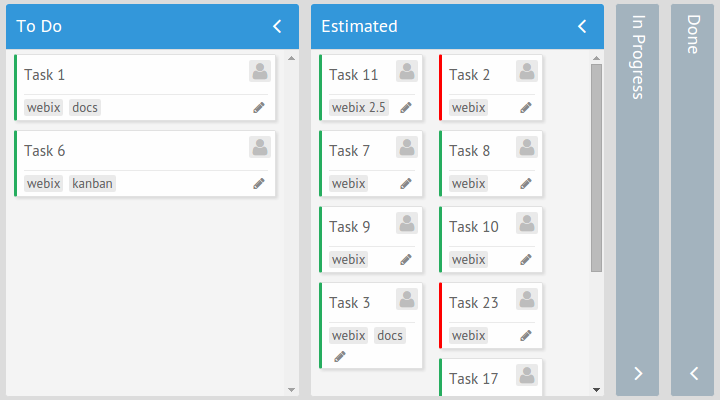
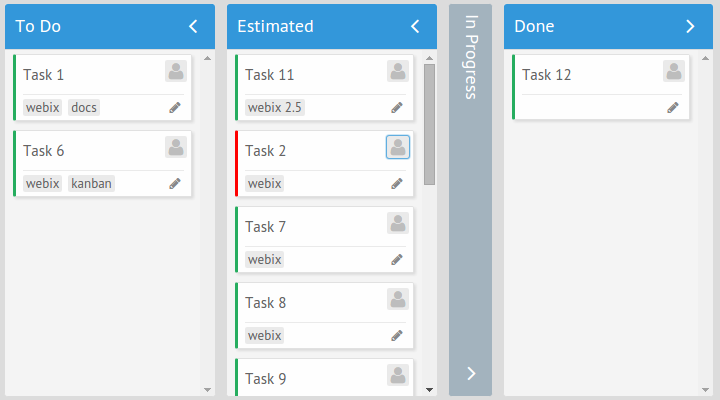
By default, all Kanban lists have items that are aligned one by one in a column. If you have thousands of tasks, you’ll have to scroll all day to find the one you need. But have no fear. Webix gives you a possibility to change it. You can use the xCount: -1 property to show more than one item per row. Changing the width property of the list and list items you can change the number of displayed tasks. Let’s try it now with the “Estimated” column:
body:{ view:"kanbanlist", status:"estimated", xCount: -1, type: {width: 120} }}
This code will change the size of every list item and the way of representation:
This feature is pretty useful if you want to place one of your columns horizontally. For example, there’s a long sequence of development stages. It may be easier to reassign the estimated tasks between these stages if you place the “Estimated” column above the other ones. Here’s an example of how you can rearrange your columns:
{ /* "To Do" column */},
{ header:"Estimated", gravity: 3,
body:{
rows: [
{view:"kanbanlist", status:"estimated",
xCount: -1, type: {width: 120}},
{ /* "In Progress" column */}
]
}
},
{ /* "Done" column */}
]
There’s no need to change the code for other columns. The main idea is that you can create the combination of rows and columns and place the proper Kanban element wherever you like. Using this approach, you can get any configuration you want.
Well, let’s return to our code example. There are “To Do” and “Done” columns that remain the same. The object we are interested in is the “Estimated” column. We used the gravity property to make it wide enough. And here’s the tricky part. Notice how we’ve changed the body of this column. It contains two rows now. The first one is the kanban list that contains the estimated tasks and the second one is “In Progress” list.
Here’s how it looks like:
Now you can see all the estimated tasks and it’s much easier to rearrange them between development stages.
Creating Swimlanes
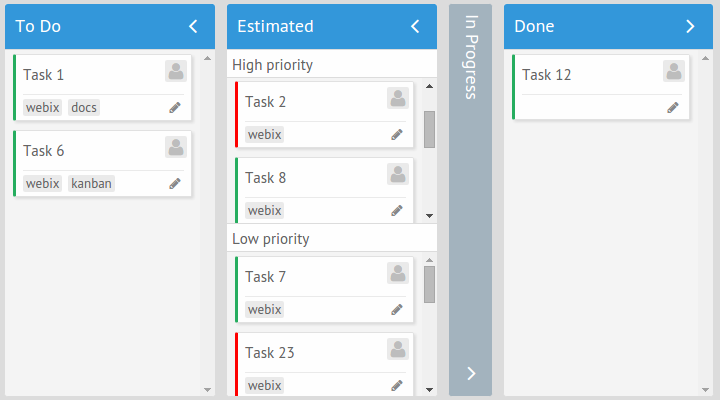
The other possible way to add some extra information to your board is to use swimlanes. Imagine that you have a board that looks like this:
There are a lot of estimated tasks, as you can see. Let’s group them using swimlanes according to the priority level:
body:{
rows: [
{template:"High priority", height: 27},
{view:"kanbanlist",
status: {status:"estimated", priority:"high"}},
{template:"Low priority", height:27},
{view:"kanbanlist",
status:{status:"estimated", priority:"low"}}
]
}
},
All you need to do is to set the complex status when you create a Kanban list: status:{status:”estimated”, priority:”low”}. This code will include all tasks that have the status:”estimated” property to the “Estimated” column. Tasks with the priority:”high” property will compose the first swimlane and tasks with priority:”low” will compose the second one.
And you’ll get your swimlanes:
Using Tabs
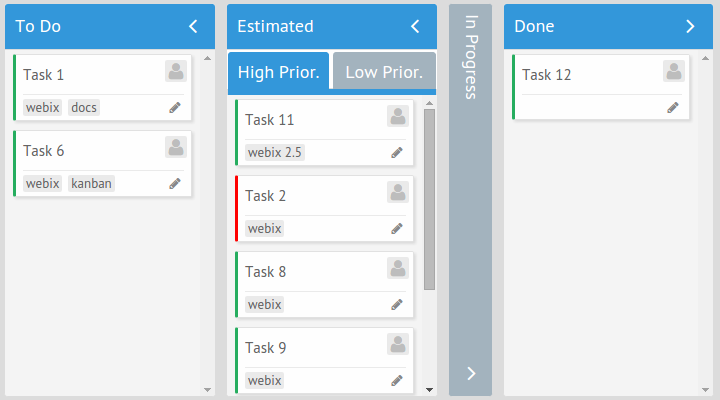
The other possibility to implement such a kind of sorting is to use the Tabview widget.
Here’s an example:
body:{
view: "tabview",
tabbar: {topOffset: 2},
cells: [
{header:"High Prior.",
body:{
view:"kanbanlist",
status:{ status: "estimated", priority:"high" }
}
},
{header:"Low Prior.",
body:{
view:"kanbanlist",
status:{ status: "estimated", priority:"low" }
}
}
]
}
}
This code will create a Tabview component with two cells within the “Estimated” column. Within the cells property, you can define the content of these cells. You can set the heading that will be displayed as tab title using the header property. The body property defines the content that that will be placed in this cell. In our case – Kanban list.
Let’s check the result:
Conclusion
With Webix, you can configure your Kanban board any way you want. You can create any layout you want and decorate the list items the way you want. There are no limits. Well, almost.


