Reading time: 3 minutes
Today, we share practical tips for building interactive dashboards with Webix. Whether you are a beginner or an aspiring app-builder, this guide shows how to create dynamic interfaces and turn simple widgets into sophisticated dashboards using Webix Jet.
I also have a demo for you, so grab the Student Dashboard Demo from Webix Hub.
Why Choose Dashboards: Benefits for Your App UI
What makes dashboards a good choice for a layout? Dashboards allow collecting a lot of widgets on one page to keep an eye on the current state of affairs in a project, class, process state, station, online-shop, etc. All widgets can be rearranged and resized on the fly. You can create simple static dashboards for viewing data or dynamic dashboards with which users can interact.

Choosing and Customizing Widgets for Your Dashboard
Keep it simple! Take existing widgets and change them with custom templates according to your needs. For example, that good-looking panel on the left is a simple List, visually transformed with a bit of custom styling. And if you look at the table at the bottom, you will notice nice green progress bars. Webix does not have them out of the box, but you can create them and use in any component:
""
+""
+""
+"Sorry, your browser does not support inline SVG."
+""
)
Webix provides various charts that can be useful in a dashboard. If you feel that you need more, you can build your own complex widgets from existing ones. For example, look at the colorful panel on the right:
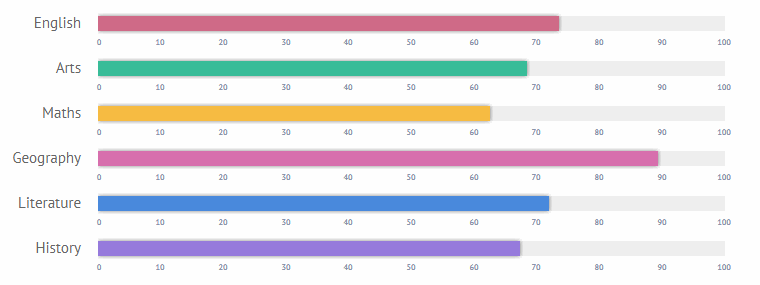
These are Bullet graphs grouped in a form. Yes, even charts can be put in a form and be treated as form controls:
view:"form",
localId:"bullets",
type:"clean",
padding:10,
rows:this.bullets()
}
let values = {
“English”:47,”Arts”:56,”Maths”:56,
“Geography”:66,”Literature”:52,”History”:55
};
this.$$(“bullets”).setValues(values);
Take existing Webix widgets like List, Charts, and Progress Bars, and customize them with templates to create visually appealing dashboards for your projects.
You can use Webix Charts, including Bullet Graphs, inside forms and dashboards, making your UI both interactive and informative.
Webix Jet: Making Your Dashboard Dynamic and Interactive
The dashboard was developed using Webix Jet, and this choice was made for a reason. Webix Jet has certain benefits. All widgets are in separate files, which makes development flexible. You can replace a widget without changing anything in the rest of the app. Same goes for changes in the data loading logic. As it is separated from the UI, you have to change the data file, and all widgets that use it will be up to date.
Let’s look under the hood and see how it works in the dashboard.
Custom events can be used to bind together widgets. For example, this is how an event is dispatched in one widget:
onAfterSelect: id => {
this.app.callEvent("student:select",[id]);
}
}
Now any part of the dashboard can listen to the event and do something in response:
this.on(this.app,"student:select", id => {
// do something
});
}
For common functionality such as loading and updating data, showing tooltips, redrawing chart legends, use custom view methods. For example, in the dashboard you can see tooltips with additional info if you point at ‘question’ isons in the corner of every panel. How many tooltips are there in total?
Only one, shown with different text over different panels. This is a tooltip view with a custom method:
config(){
return {
view:"tooltip",
template:"#value#"
};
}
showTooltip(tp,pos){
const tooltips = [
{"id":1,"value":"Tip 1"},
{"id":2,"value":"Tip 2"},
{"id":3,"value":"Tip 3"},
...
];
this.getRoot().show(tooltips[tp],pos);
}
}
You can use this class to show tooltips in the dashboard:
this.tooltip = this.ui(TooltipView);
let questions = view.$view.querySelectorAll(".question");
for (let i = 0; i < questions.length; i++){ webix.event(questions[i],"mouseover", e => {
this.tooltip.showTooltip(i, webix.html.pos(e));
});
}
}
With Webix Jet, each widget is modular and events can be dispatched to make your dashboard fully dynamic and responsive to data changes.
Try It Yourself
Use these Webix dashboard tips to create your own dynamic and interactive interfaces. Explore the student dashboard demo on GitHub, customize widgets, charts, and layouts, and start building engaging apps toda. Feel free to use the demo in your projects all you like.
You are also welcome to share your thoughts and advice on building UIs with Webix in the comments below. Drop us a line about today’s tips, your developing experience, to ask a question or just to say ‘Hi’.


