Remote work has become the norm for many IT professionals. Managing teams across different locations requires tracking employee geolocation and local time efficiently. This guide shows how to create a location viewer app using Webix UI and OpenStreetMap.
You can find the full source code and a live demo here.

Just a couple of years ago, it was hard to imagine that remote work could be the norm of everyday life. But today, it is a common thing. A lot of employees don’t want to spend precious time commuting during rush hour to their workplace in the center of a huge city.
There are much more pleasant things to do instead. You can spend this time reading a fascinating book, drinking a cup of coffee and petting your beloved cat. All of these things can be done while sitting on a balcony overlooking the sea. Do you think it is only a dream? No! It is the daily routine of many IT professionals and not only.
Based on such specifics of work, the company’s managers may have additional worries. It is about tracking the location of staff and synchronizing their work schedules. And in this article, I’m going to show you how to solve such difficulties using the Webix components and third-party solutions.
Overview: Creating a Location Viewer App for Remote Team
Let’s imagine that you manage an IT department where all employees work remotely. Each of them is located in one of the European countries. Depending on the location, the local time of employees may slightly differ.
As a good manager, you want to keep a list of team members at hand all of the time. When clicking on some employees from this list, you can easily get to know their geolocation and local time.
We have planned the functionality of our app. Now let’s think about how to organize all these features in such a way to make the interface simple and user-friendly.
And to start with, we will divide our app into 2 conditional parts. On the left, there will be a list of employees and buttons for managing the map, and on the right, a geolocation map.
In the browser, our app will look like this:
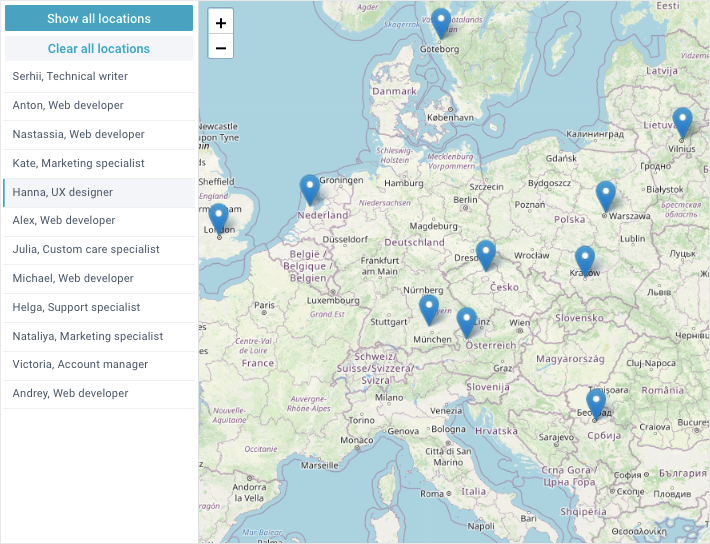
We have defined the functionality and interface of the application. Now let’s move on to practice and see how to implement all of these using Webix components and third-party solutions.
Setting Up Webix and OpenStreetMap Resources
To work with Webix, we need first to include its resources. For our app, we can use the standard GPL version of the library. It can be downloaded here or included via CDN with the following links:
Besides the core library, we need to include resources of the OpenStreetMap service, which will be used as an interactive map.
For your convenience, the Webix developers created a special integration. It allows you to initialize the interactive map as a basic Webix component. To use this integration, you need to connect its resources via CDN by the following link:
Building the App Layout with Webix UI
Now let’s look at the layout of our application. It is worth noting here that Webix uses a declarative approach when building interfaces. It means that each component is a json object, which stores all the characteristics as key:value.
By nesting such objects into each other, we can form the structure of the interface. Note that the interface is initialized via a special webix.ui() constructor, which takes a json object with a ready-made layout.
We have finished with the theory of creating layouts. Now, let’s apply this knowledge in practice and create the skeleton of our app.
When outlining the interface, we decided to divide it into 2 vertical parts. On the left part, we will place a list of employees and controls for managing the map. The map will be placed on the right one. Such dividing of the layout into columns is implemented via the cols property. In code it looks like this:
cols: [
{
// configuration of the list and 2 controls
},
{
// configuration of the map
},
],
});
The list of employees and 2 buttons for managing the map will be placed into the left column as rows. Such dividing of the layout is implemented via the rows property. The code of our layout will look like this:
cols: [
{
rows: [
{...}, // configuration of the button
{...}, // configuration of the button
{...} // configuration of the list
],
},
{
// configuration of the map
},
],
});
We have included all the necessary sources and formed the layout of the app. And now let’s see how to configure the relevant parts of the interface and implement the functionality mentioned above.
Adding an Interactive Employee List
We will use the Webix List widget to display employees and their positions. This interactive list allows managers to click and view each employee’s location on the map. To cover our needs, the basic configuration of this widget will look like this:
view: "list",
id: "list_id",
template: "#name#, #position#",
select: true,
borderless: true,
url:"./data/list_data.json"
}
All Webix components can be initialized via the view property. To refer to a widget and use its API, we specify a unique identifier via the id property.
Each element of the list will contain the name of the employee and their position. Such displaying is defined via the template property, which takes a string with the corresponding data keys (#name#).
Among other things, we can enable the element selection via the select property and hide the widget borders through the borderless config.
And it remains to load only the data stored in a separate json file. You can do this using the url property, that takes the corresponding path to the file as the value. It’s worth noting here that the similar data property is used for loading only the data stored on the client side.
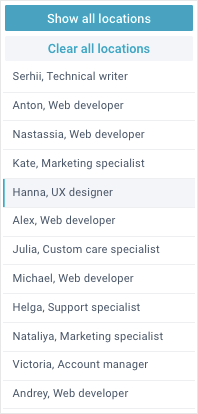
The list of employees is ready. Let’s add 2 extra buttons to control the map and place them above the list. The configuration of these controls will look like this:
{ id: "clear_all_locations", view: "button", label : "Clear all locations" },
{ /* list */ }
Besides the id and view properties, we specify the name of each button via the label property. The top control will be additionally stylized via the css property. That’s it. The left side of the interface is completely done. In the browser, we will see the following result:
Integrating OpenStreetMap for Employee Geolocation
Defining the geolocation of employees requires an appropriate map. For this purpose, we will use the OpenStreetMap service. It allows marking certain points on the map with special markers using specified coordinates. It is also possible to attach pop-up messages to these markers.
As you know, the developers of the Webix team are always looking out for the components’ usability. It relates to the integration with the third-party solutions as well. The OpenStreetMam service is not an exception. Based on this, we can initialize the map as a regular Webix component. The map configuration will look like this:
view: "open-map",
id: "map",
zoom: 5,
center: central_point
}
Besides the id and view properties, we can set the initial map scale via the zoom property and specify an array with center point coordinates via the center property.
Further, these coordinates will be used to go back to the initial map location. So let’s store them in the central_point variable:
That’s all. We have created the app interface, and all we need is to make it interactive.
Adding Interactivity: Markers and Pop-ups
Most of the operations of our app will involve interacting with the map. With this in mind, we need to send a request and wait until the map API is fully loaded. This is implemented using the getMap() method, which takes the true value as a parameter. This parameter allows the method to return a promise that will be resolved to the map object.
// all the operations will be described here
});
In the body of the callback function, we need to describe all the app operations related to the map API. Let’s start with the list of employees.
List of Employees and Markers
For each employee from the list, we need to show their location on the map. It is logical to do so by clicking on the corresponding list item. On the map, we will show a marker and a popup with information about the employee: name, city, country, and local time.
Using OpenStreetMap integrated with Webix, we can mark employee locations and attach pop-ups showing name, position, location, and local time.
To show a popup message, we can create a separate function. To make our popup more dynamic, let’s hide it after 3 seconds. To implement all these features, our function requires an employee data object and a marker object. The full code of the function will look like this:
const time = new Date().toLocaleString("en-GB", {
timeZone: item.time_zone,
dateStyle: "short",
timeStyle: "short",
});
if (marker.isPopupOpen()) {
marker.closePopup().unbindPopup();
clearTimeout(item.popup_timer);
item.popup_timer = null;
}
marker.bindPopup(
`Name: ${item.name}
Position: ${item.position}
Location: ${item.location}
Local time: ${time}`,
{ closeButton: false, closeOnClick: false }
).openPopup();
item.popup_timer = setTimeout(function () {
marker.closePopup().unbindPopup();
}, 3000);
list.updateItem(item.id, item);
map.setView(item.coordinates);
}
At the very beginning, we receive a string with the date and local time of the employee via the toLocaleString() method of the Date class. The method takes a locale (“en-GB” by default) and an object with date and time configurations.
In this object, we specify the time zone stored in the data of each employee (the time_zone key), and the parameters for displaying the date and time. The returned value will be stored in the time variable and will be used when generating a pop-up message.
Next, we create a popup for the marker via its bindPopup() method and display this popup via the openPopup() method. Note that the first method takes a string with the corresponding message as a parameter.
When describing the function, we have defined that our popup will be hidden after 30 seconds. To do this, we need to create a timer, which closes and deletes the popup using the corresponding closePopup() and unbindPopup() methods.
To have the ability to reset the timer ahead of schedule, if necessary, we store its value to the employee data object using the popup_timer key. And after this, we need to update this object via the updateItem() method.
And such a need will appear when showing the popup once again before the timer deletes it itself. To avoid such a situation, we need to check the popup status before creating a new one.
This can be done via the isPopupOpen() method of a marker. If the popup is open, we close and delete it, as well as reset the timer and remove its value from the employee data:
marker.closePopup().unbindPopup();
clearTimeout(item.popup_timer);
item.popup_timer = null;
}
And finally, we need to center the marker the popup was shown for. This is implemented via the setView() method, which takes an array with the corresponding coordinates. By the way, the coordinates of the location of each employee are stored in its data object using the coordinates key.
Now go back to the list of employees. Let’s handle the event fired when clicking on the list item. The full code of the handler will look like this:
const item = list.getItem(id);
if (item.marker) {
showPopup(item, item.marker);
} else {
item.marker = L.marker(item.coordinates).addTo(map);
item.marker.on("click", function (ev) {
showPopup(item, ev.target);
list.select(item.id);
});
showPopup(item, item.marker);
}
});
First, let’s get the data object of the list item the event is fired on. For doing this, we can use the getItem() method, which takes the id of the target element. Next, it is necessary to check if the data object of the selected employee includes the marker data.
If the marker already exists, we only need to show its popup using the previously created showPopup() function.
Otherwise, we create a new marker using the L.marker() method, which takes the employee’s coordinates. After this, we add the marker to the map via the addTo() method and show its popup using the already known showPopup() function.
But that’s not all! We also need to display a popup when clicking on this marker on the map. And for this, we have to handle the event fired when clicking on this marker. There is a special on() method for this. Inside the handler, we show the popup via the showPopup() method and select the corresponding employee in the list via the select() method.
Done. Now, when you select any employee from the list, the widget will mark his location on the map with a special marker and display a pop-up message with detailed information and local time. The same behavior will occur when clicking on the marker itself on the map. We’ll make the app interactive by connecting the employee list to map markers, so clicking on a list item highlights the employee’s location and current time.

Map Management: Show All Locations & Clear Map
We also have to set 2 controls to manage the map. The first control will mark the geolocation of all employees on the map with markers, and the second one will completely clear the map.
Let’s start with handling the click on the “Show all locations” button. The full code of the handler will look like this:
list.unselectAll();
list.data.each(function (obj) {
if (!obj.marker) {
obj.marker = L.marker(obj.coordinates).addTo(map);
obj.marker.on("click", function (ev) {
showPopup(obj, ev.target);
list.select(obj.id);
});
}
});
map.setView(central_point);
});
Since the selected elements of the list are directly related to the markers on the map, we first need to clear the selection of these elements. This is accomplished by using the unselectAll() method.
Next, we iterate over the elements of our list using the each() method and check if any of them contains the marker data. If the element doesn’t include a marker, we create a new one and attach it to the map.
After that, we need to handle the click on this marker in order to display the popup and select the corresponding employee in the list.
showPopup(obj, ev.target);
list.select(obj.id);
});
And finally, we reset the map to the initial coordinates stored in the central_point variable.
Now we move on to the “Clear all locations” button. When clicking on this control, our app should clear the map. And for this, it is also necessary to handle the click event. The full code of the handler will look like this:
list.unselectAll();
list.data.each(function (obj) {
if (obj.marker) {
obj.marker.remove();
obj.marker = null;
}
});
map.setView(central_point);
});
Here we perform the similar actions as in the previous handler, namely:
– reset selection of the list items
– go through the elements which include markers by deleting these markers and clearing the corresponding data
– reset the map to the initial coordinates
And that’s it. Now, when clicking on the corresponding control, the users will be able to look through the location of all the people from the list, and, if necessary, clear the map up.
Conclusion: Build Your Own Employee Location Tracker
You can find the full source code and a live demo here.
In this article, we have covered the integration of the Webix components with a third-party solution as the OpenStreetMap map. And now you know how to build a fully interactive location viewer app for remote employees using Webix UI and OpenStreetMap, complete with employee markers, pop-ups, and map controls. Check out the live demo and full source code to get started today.
To read more about the integration possibilities of Webix, visit the related page in the Webix documentation. There you can find a detailed description of how to use the integrated components and how to create your own integration templates.


