As promised, today I will share with you a Webix solution for creating real-time apps. You will find out how to use a WebSocket connection for:
- smooth live updates in data components,
- creating live chats with Webix Comments.
Grab the demo and join me.
Live Updates for Data Widgets
Let’s begin with live updates for data components. I will use Datatable as the example. First, I will load initial data without the socket, e.g.:
view:"datatable", id:"data",
data:some_data
});
I need to tune sockets only for data updates. So let’s create a simplest socket connection:
Next, I will send data to the backend when they are changed on the client side. I will use the onStoreUpdate event to catch the right moment and socket.send() to send the data:
socket.send(webix.stringify(update));
});
After that I need to be ready to receive the data from the server and update them on the client. Note that to avoid unnecessary saving of the same data back to the server, I will wrap the code in DataProcessor.ignore():
var update = webix.DataDriver.json.toObject(e.data);
webix.dp(view).ignore(() => {
// update view data
// …
});
};
For this demo, the backend is kept as simple as possible. When a message is received, the backend sends it to all the clients connected to the socket:
//live updates for data sample
const wss = new WebSocket.Server({ port:8080 });
wss.on(‘connection’, function connection(ws) {
ws.on(‘message’, function incoming(message) {
// save message to DB
message = _dummySave(message);
// send it to all clients
wss.clients.forEach(function each(client) {
client.send(message);
});
});
});
//emulate saving to db, where record id usually defined
function _dummySave(message){
message = JSON.parse(message);
if (message.operation == “insert”){
message.data.id = “s”+ message.data.id;
}
message = JSON.stringify(message);
return message;
}
The basic solution is ready! But how to wrap it into a reusable module? Webix Proxy is the answer.
Creating a Proxy for Live Updates in Data Components
A proxy has the load() and the save() methods:
- load() is called when view.load is called or when you have set config.url initially.
I will use proxy.load to initially establish a socket connection. - save() is called on any data update, which coincides with the moment when the onStoreUpdated event is triggered. So instead of the event, I will use save() to send data to the server via a web socket.
Let’s declare the proxy and use the above code plus a few more things:
- an error handler for WebSocket errors,
- a way to close the socket when the related view is destroyed.
webix.proxy.socket = {
$proxy:true,
load:function(view) {
//create a socket connection
this.socket = new WebSocket("ws:"+this.source);
//handle errors
this.socket.onerror = (error) => {
console.log(“WebSocket Error”, error);
};
//receive updates
this.socket.onmessage = (e) => {
// update view data
// …
};
//close a socket connection when a view is destroyed
view.attachEvent(“onDestruct”, () => {
this.socket.close();
});
},
save:function(view, update) {
//send message to server
this.socket.send(webix.stringify(update));
}
};
Now I can define a common proxy for loading and saving data. I will use webix.proxy() that requires three parameters:
- the name of the proxy,
- the URL to which to connect,
- the configuration settings with the unique ID of the client and the key.
var data_proxy = webix.proxy("socket", "//localhost:8080", {
key:"data", clientId:webix.uid()
});
//use the proxy
webix.ui({
view:”datatable”,
url:data_proxy,
save:data_proxy
});
That’s the general idea, now let’s fine tune the proxy.
Proxy for Live Updates in Details
Sending Data
Before sending data from a client, I need to mark them to make sure all clients will work with them correctly when they receive them. I will mark data with clientId and key that were set in the proxy configuration. And this is how this works:
1. clientId is needed to identify the client among all the clients connected to the socket.
2. Usually there is a common socket connection for all components in an app. That is why key is needed to identify the component among all the components that use the socket.
So let’s mark the data to send in the save() method of the proxy:
update.clientId = this.clientId;
update.key = this.key;
//send data
this.socket.send(webix.stringify(update));
}
With the help of the key and the ID the received data will be updated for other clients.
Updating Data
In the onmessage handler set in the load method, I will check the incoming data updates that are received by a client. Let’s return to the onmessage callback of the socket. The callback receives the message event that contains the data object with the following properties:
- key,
- clientId,
- the operation type,
- data with the actual data that needs to be updated.
Depending on the key and clientId, I will decide what to do with the incoming messages.
1. If the message came from a different type of widget, ignore it:
// ...
this.socket.onmessage = (e) => {
var update = webix.DataDriver.json.toObject(e.data);
if (update.key != this.key) return;
//...
}
}
2. Next let’s deal with the case when the data operation was issued by the same client. If it is an insert operation, the data item usually receives an ID generated in the backend. That’s why we need to update it on the client side.
// ...
this.socket.onmessage = (e) => {
var update = webix.DataDriver.json.toObject(e.data);
if (update.key != this.key) return;
if (update.clientId == this.clientId){
if (update.operation == “insert”)
view.data.changeId(update.id, update.data.id);
}
//…
}
}
3. If the data operation came from a different client, save the data on the client and do not forget to wrap operations in dp.ignore() to prevent the data from being saved to the server again.
// ...
this.socket.onmessage = (e) => {
var update = webix.DataDriver.json.toObject(e.data);
if (update.key != this.key) return;
if (update.clientId == this.clientId){
if (update.operation == “insert”)
view.data.changeId(update.id, update.data.id);
}
else {
webix.dp(view).ignore(() => {
if (update.operation == “delete”)
view.remove(update.data.id);
else if (update.operation == “insert”)
view.add(update.data);
else if (update.operation == “update”)
view.updateItem(update.data.id, update.data);
});
}
}
}
The proxy is completely ready and you can use it for live updates in data components.
Notes
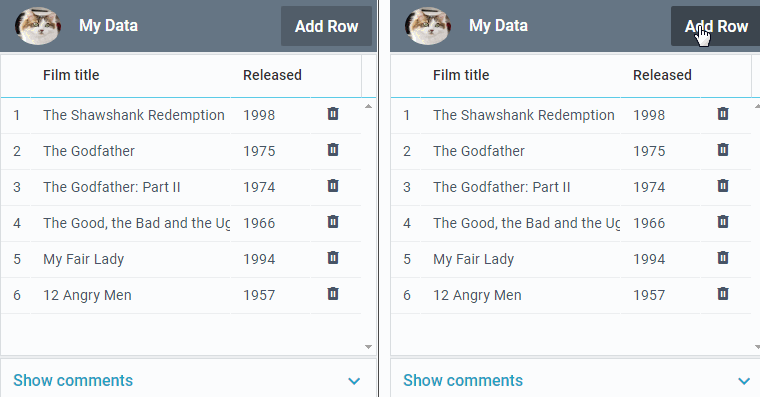
Note that in the demo alongside the url property there is also data. This is done purely for the demo to load some initial data.
view:"datatable", id:"grid",
columns:[
{ id:"title", editor:"text", header:"Film title", width:200},
{ id:"year", editor:"text", header:"Released" , width:100},
{ header:"", template:"{common.trashIcon()}", width:50}
],
select:"row", editable:true, editaction:"dblclick",
data:webix.ajax("/samples/server/films"),
url:data_proxy,
save:data_proxy
};
Live Chats with Webix Comments
The above technique can be used for live updates with all webix data widgets. However, implementing live updates for the Comments widget has some peculiarities. Comments is a complex widget of sorts, and data coming from the server should be added/updated not in the Comments view, but in its inner List.
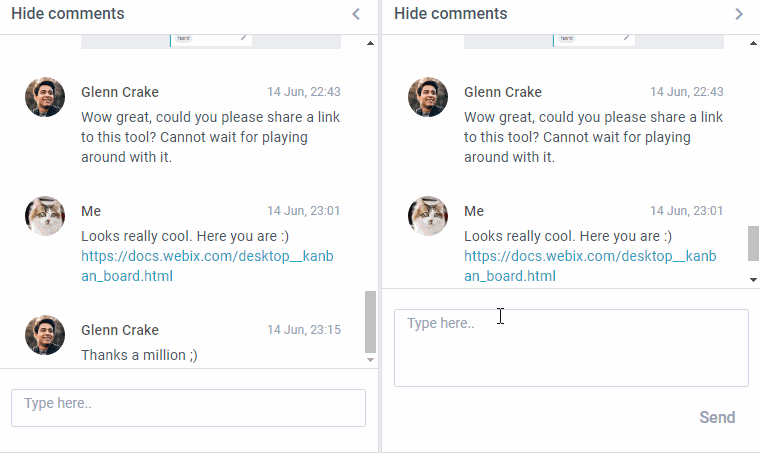
So just extend the above proxy and redefine the load() method so that the data was loaded into the inner list:
init:function(){
webix.extend(this, webix.proxy.socket);
},
load:function(view){
webix.proxy.socket.load.call(this, view.queryView("list"));
}
};
What’s Next
You can expand and reuse the WebSocket-based proxy for live updates in Webix apps. A WebSocket-based custom proxy is a better alternative to the Faye proxy that is currently deprecated and will be removed in Webix 7.0. You can find more info on proxies in our documentation in Webix Proxy Objects.


