In the world of innovative technologies, it is hard to imagine a person who has never listened to music online. I suppose that most of the developers have tried to write their own playlist at least once. And I am no exception 🙂. In this guide, I’ll show you how to build a small Playlist app using Webix UI.
In the application, we will implement the following:
- ability to look through the list of tracks
- ability to manage tracks:
- play, pause and stop
- track and manage a progress
- ability to load new tracks.
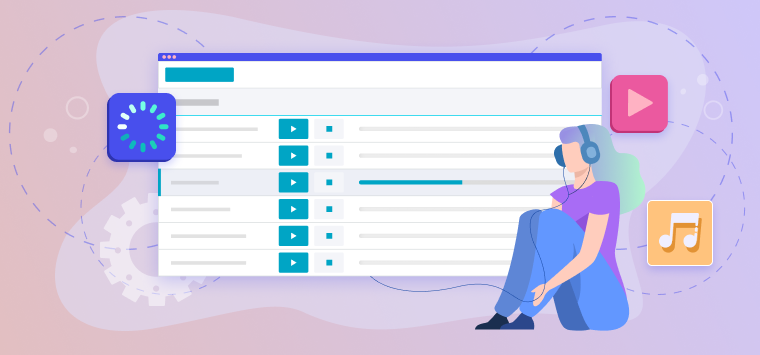
In the browser, our application will look like this:
The Webix library has almost all the necessary tools to implement the functionality we need. For example, we can display the list of tracks using the DataTable or List components. To upload the new tracks we can use the Uploader widget. There is also a wide range of buttons and icons for creating the necessary controls.
The only thing we still need is a player for audio records. But there is no such a widget among the Webix components. So where do we get it from? Let’s use the third-party Plyr player. And the next logical question is: Can we team up the Webix widgets with the third-party components? As a matter of fact, Webix solves this problem quite easily. The library has a whole set of extensions that can be used to integrate with its own components. And the Plyr player is one of them.
It is also worth mentioning that if you haven’t found the extension you need, you can create your own integration template. Read more about it in the related article of Webix documentation.
So now we have all the required tools. Let’s see how to build our application with their help.
Building the Playlist Table
To create a playlist itself, we use the DataTable widget. Let’s make it so that users can manage tracks directly in the rows of the table. And here may arise a reasonable question: how to implement it in the most efficient way?
Basically, we can place a separate player in each row opposite the track title. But this approach has several significant flaws. Firstly, the user can run several tracks at the same time. As you understand, it is not the best scenario. And secondly, we need to consider the specifics of the work of the table itself. One of the many advantages of DataTable is exactly what we need – displaying only elements that are visible on the screen at the current time. This approach significantly increases the rendering speed of the application and its performance. When the user scrolls the table, it redraws the newly appeared elements.
It is possible that the user will add a couple of hundred tracks to the playlist and scroll through it back and forth fiercely. Such redrawing can definitely affect the speed of our application. But we need to make it fast and easy to use.
The best solution is to draw special controls in the rows of the table using HTML templates. After this, we need to place the player into the layout next to the table and hide it. As you can see, we create a player only once. Using controls in the rows, we can manage the player through its API. Let’s do it. First we need to create a table and configure it. It looks like this:
view:"datatable",
id:"table",
data:play_list_data,
columns:[...]
}
To declare the widget we use the view: “datatable” expression. After that, we can specify a unique id, to access the table from the outside.
Let’s make it so that the playlist includes several tracks by default. It gives users an ability to test how the application works before uploading their own audio records. We can keep the track data in a separate array. For each song, we need to store its name, source and type:
{
songTitle:"Bensound - The Jazz Piano",
source:{
src:"https://www.bensound.com/bensound-music/bensound-thejazzpiano.mp3",
type:"audio/mp3"
}
},
//...
];
To load the tracks that are stored on the client, we use the data property of the table.
Our playlist table consists of 3 columns. Let’s move to their configuration. We can set the corresponding settings for each of them in the columns array. The first column contains the track titles. The second one includes special controls to manage the audio records. In the cells of the third column, we place the progress bars.
Here I need to tell you a little about the controls for managing tracks in the table. Their templates can be defined using the webix.type() method. This method takes the name of the widget in which the templates are used, as well as an object with a description of the required controls. In the settings object, we specify the type name through the name property and template functions for each control. It looks like this:
name:"audioTable",
toggleplay(obj){...},
stop(){...},
progress(obj, common){...}
});
To use these templates in the column settings, we need to set the type property of the table to the previously created type name (audioTable). It should also be borne in mind that these templates are available to use through the common object:
- common.toggleplay() – toggle button to play and pause a track
- common.stop() – button to stop a track
- common.progress() – progress bar.
Now the code with column settings looks like this:
type:"audioTable",
columns:[
{ id:"songTitle", header:"Title", width:200 },
{ template:`{common.toggleplay()}{common.stop()}`, width:120 },
{ template:`{common.progress()}`, fillspace:true }
]
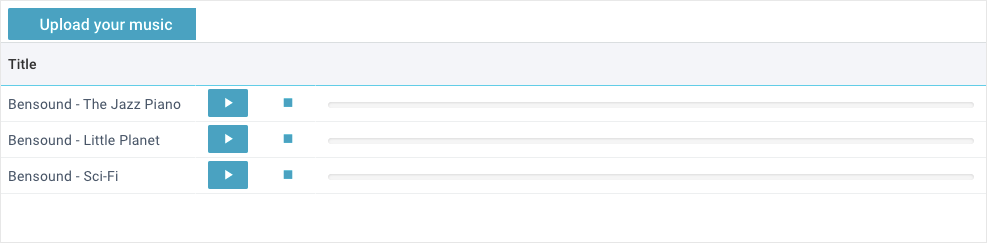
In the browser, our playlist looks like this:

Integrating the Plyr Audio Player
Now we need to create a component for playing tracks. For this we use the third-party Plyr player. To add a player to our application, we need to include the corresponding file with its configuration in the main HTML file. The Plyr integration code with the Webix library is available via the following link:
Now we can create a player and use its API to manage tracks. Let’s do it. To add the Plyr component to our playlist, we need to include the object with its settings into the application layout. It looks like this:
view:"plyr-player",
id:"audio",
hidden:true,
height:50,
config:{
controls:["play", "progress", "current-time"]
},
source:{ type:"audio" }
},
//...
To declare the player itself we use the view:”plyr-player” expression. It is also necessary to specify a unique id to get access to the player from outside.
In the object of the config property of the player, we can specify the necessary controls. Here we need a toggle button to play and pause the track (“play”), a progress bar (“progress”) and the current playing time (“current-time”). Using the source property, we can set the type of files to play. That’s all the settings we need. In the browser, the player looks like this:
![]()
Since we have created the corresponding controls for managing tracks in each row of the table, we can hide the original player. To do this, set its hidden property to true.
Synchronizing Player with Playlist Controls
When the playlist interface and the player for audio tracks are ready, it is necessary to tune the interaction between them. We can start with the controls for managing the tracks in the table. I want to remind you that each row contains a toggle button with which users can play and pause a track. Next to it is the button to stop the track. The cells of the last column contain progress bars.
Let’s handle the click events on these controls. Since each of these controls has its own css class, we can use the onClick property to set corresponding handlers on their click events. It looks like this:
columns:[...],
onClick:{
toggleplay:togglePlayback,
stop:stopPlayback,
progress:setProgress
}
Each of these handlers takes the event object and the id of the row where the click occurred.
Before creating these handlers, we need to save access to the table and player to the corresponding variables via their ids:
const table = $$("table");
We will use these variables later when working with handlers.
How to Play and Pause Tracks
Now let’s create our handlers. We can start with the togglePlayback() function. It will play the track when it is stopped and vice versa. The function takes the row id in which the button is placed. Using the getItem() method of the table, we get the row data object by its id and save it to the item variable.
So now we need to work with the Plyr player API and start playing the track. In order to wait until the player is fully loaded, we call its getPlyr() method, which returns a promise. When the promise is resolved, inside the callback function of the then() method we access the player object with its API. The function looks like this:
const item = this.getItem(id);
audio.getPlyr(true).then(plyr => {...});
};
Inside the callback function of the then(plyr => {…}) method we need to synchronize the state of the toggleplay button of the selected row with the player. It means that if the user clicks on the button in the play mode (false), the function will start the player and set the button mode to pause (true). When the user clicks again, the function will perform inverse logic. Let’s take a closer look at how to implement this.
First we need to save the id of the selected row into the $linkedRow property of the player. This property will be compared with the id of the selected row in the table when the user clicks on the button again or clicks on the button from another row:
audio.$linkedRow = id.row;
}
When playing a track for the first time, we need to load its data to the player. This can be done via the define() method of the player. This method takes an object with the corresponding settings and the track data:
audio.$linkedRow = id.row;
audio.define({
source:{
type:"audio",
sources:[ webix.copy(item.source) ]
}
});
}
In the object of the source property, we can set the file type through the type property and the track source through the sources property. The track source is stored in the item object of the selected row. We need to copy it using the webix.copy() method. It is done to avoid changing the original data in the table.
Now let’s run the track itself. To do this, we use the play() method. We can imagine a situation when the track has not been loaded yet but the player is ready to play it. To avoid such a situation, we start playing the track only when it is fully loaded. To do this, we need to call the once() method of the player with the “canplay” key and then run the track using its play() method. The code looks like this:
audio.$linkedRow = id.row;
audio.define({...});
plyr.once("canplay", () => plyr.play());
Now we need to change the state of the button that the user has clicked on in the table. This is done using the updateItem() method of the table. It takes the id of the selected row and the object with the changed data. It is worth noting that when creating the toggleplay button template, we used the following expression:
If we set the $isPlaying property to true or false, the template icon will be changed to pause and play correspondingly:
audio.$linkedRow = id.row;
audio.define({...});
plyr.once("canplay", () => plyr.play());
this.updateItem(id.row, { $isPlaying:true });
We have described the logic when the user clicks on the toggleplay button at the first time. Let’s make it so that the track is paused when the user clicks on the button again. First, we need to compare the track id with the id of the row in which the button is placed. If they match, we will make the following:
if(audio.$linkedRow == id.row){
const state = item.$isPlaying;
plyr.togglePlay(!state);
this.updateItem(id.row, {
$isPlaying:!state
});
return false;
};
//…
}
In this block, we get the current state of the button through its $isPlaying property and save it to the state variable. Next, we need to pass the opposite value of this state to the togglePlay() method of the player. Depending on the passed argument (state), the method will play or stop the current track. If the button state is true (the track is playing and the icon is “pause”), the handler will change it to false and pause the track. After that, we update the button state in the table through its updateItem() method and stop executing the handler with the return operator.
We have considered the situations in which the user clicks on the button the first time to run the track and clicks on this button again to pause it. Let’s also consider a situation when the user clicks on the button to run another track. Here we need to do the following steps:
- stop playing the current track using the stop() method of the player
- reset the toggleplay button state via its $isPlaying property
- reset the progress bar value via its $progress property
- reset the current track id, which is stored in the $linkedRow property of the player
- perform the logic for running the track the user clicked on.
The code looks like this:
//...
if(audio.$linkedRow && audio.$linkedRow !== id.row){
plyr.stop();
this.updateItem(audio.$linkedRow, {
$progress:null,
$isPlaying:false
});
audio.$linkedRow = null;
}
//...
}
Now the user can play and pause the track by clicking on a dedicated button in the playlist.
Stopping Tracks and Resetting Controls
Now we need to create the stopPlayback() function. It stops the current track in the player and resets all controls of the selected row to their initial state. The function looks like this:
if(audio.$linkedRow == id.row){
audio.getPlyr(true).then(plyr => {
plyr.stop();
this.updateItem(id.row, { $progress:null, $isPlaying:false });
audio.$linkedRow = null;
});
}
};
First, we need to compare the track id with the id of the row in which the button is placed. If they match, we call the getPlyr() method of the player and access the object with its API. Inside the callback function of the then() method we do the following steps:
- stop the current track using the stop() method of the player
- reset the progress bar and the toggleplay button state via the updateItem() method of the table
- reset the current track id, which is stored in the $linkedRow property of the player.
Handling Track Progress
Now we need to create only the setProgress() function. It manages the progress bar state in the table and the track playing time in the player. When the user clicks on the progress bar in the table, the handler will fill in the control to the required level and rewind the track to the corresponding time. The function code looks like this:
if(audio.$linkedRow == id.row){
const nodePos = webix.html.offset(node);
const pointerPos = webix.html.pos(e);
const progressPart = (pointerPos.x-nodePos.x)/nodePos.width;
audio.getPlyr(true).then(plyr => {
const fullTime = plyr.duration;
const seekTime = Math.round((fullTime*progressPart) * 100) / 100;
plyr.currentTime = seekTime;
});
}
return false;
};
First, we need to compare the track id with the id of the row in which the event fired. After this, we get the location and size parameters of the progress bar (nodePos), as well as the cursor coordinates (pointerPos). Given these values, we calculate the progress state in the range from 0 to 1 (progressPart).
Next we call the getPlyr() method of the table, which returns a promise. When the promise is resolved, inside the callback function of the then() method we access the player object with its API. To get the full duration of the current track, we use the duration property of the player. After that, we need to calculate a new playback time considering the track duration and the progress bar state in the table (seekTime).
To start playing the track from the specified time, we need to set the currentTime property of the player to the calculated time value.
To stop the handler execution and prevent the propagation of other events (for example select) when clicking on the progress bar, we need to use the return operator at the end of the function.
Now the users can play, pause, stop and rewind the tracks using the corresponding controls in the playlist. But that’s not all. When the user runs the track, it starts playing, but the progress bar in the table is not moving. To fix it, we need to listen to the “timeupdate” event in the player and update the progress bar in the table. For this, we call the getPlyr() method of the player and handle the necessary events in the corresponding callback. The code looks like this:
plyr.on("timeupdate", e => {
const id = audio.$linkedRow;
if(id){
const item = table.getItem(id);
const progress = Math.round((plyr.currentTime/plyr.duration) * 100);
if(item.$progress != progress){
table.updateItem(id, { $progress:progress });
}
}
});
//…
});
Besides the progress bar updating, we also need to reset the playlist controls to their original state after the track is done. To do this, we subscribe to the “ended” event of the player and reset controls when it fires. It looks like this:
plyr.on("timeupdate", e => {});
//...
plyr.on("ended", e => {
const id = audio.$linkedRow;
if(id){
table.updateItem(id, { $isPlaying:false });
}
});
});
Adding New Tracks to Your Playlist
To make our Playlist app full-fledged, we need to provide the user with the ability to load new tracks into the playlist. Let’s implement it using the Uploader widget of the Webix library. For this, we need to add an object with component configuration into the application layout. The code looks like this:
view:"uploader",
value:"Upload your music",
accept:"audio/*",
inputWidth:200,
multiple:true,
autosend:false
},
//...
Using the accept property we can specify the type of files to upload. The multiple:true property allows us to upload several files at once. Since the application is designed to be used on the client-side, we need to set the autosend property to false. It prevents the files from uploading to the server by default. The selected files are added to the Uploader body, where we need to process and load them into the table.
Let’s handle the onBeforeFileAdd event, which fires before the widget tries to upload files to the server. The handler of this event will intercept the default uploading logic and send the new track data directly to our playlist. To set the handler to the required event, we use the on property of the widget. The code looks like this:
view:"uploader",
//…
on:{
onBeforeFileAdd:addAudio
}
}
Now we need to create this handler. The function code looks like this:
const file = obj.file;
const reader = new FileReader();
reader.onload = function(e){
const track = e.target.result;
table.add({
songTitle:obj.name,
source:{
src:track,
type:file.type
}
});
};
reader.readAsDataURL(file);
return false;
};
The function takes an object with the selected file(s) as a parameter. In order to load this file(s) to the table, we need to create an instance of the FileReader class. Using its onload property, we can define a special handler with the required logic and set it on the file load event. In this handler, we specify the needed data object and load it to the table via its add() method.
When the handler of the load event is ready, we can run reading of the file to execute the handler logic. To fire the load event, we need to call the readAsDataURL() method of the FileReader class and pass the selected file to it as a parameter.
We have got the required file(s) and loaded it to the table. Now we need to stop performing the logic of the Uploader widget. For this, we use the return operator to finish the handler.
Now the user can upload its favorite tracks and manage them via the playlist interface.
Conclusion
In this article, we have figured out how to create a Playlist app with Webix UI and integrate a third-party audio player (Plyr). You can now build your own JavaScript apps with track management, playback controls, and file uploads. For more integration tips, check the related page of Webix documentation. There you can find a detailed description of how to use the integrated components and how to create your own integration templates.


