Many UI components contain a built-in search or filtering. Such as, for example, the tool of filtering in the Webix DataTable.

There are search and filtering in numerous Webix data widgets. In this article we will tell you how to improve the existing mechanism of displaying found data, namely, implementing highlighting of found text extracts to make the search/ filtering results more visible.
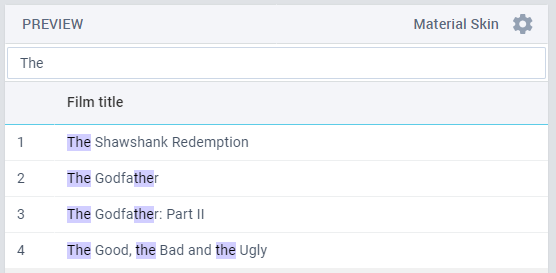
Pic.1 Search results with the found data highlighted
In Webix eco environment searching and highlighting can be implemented as a combination of two existing features:
- common data filtering,
- specific template of the column (for datatable) or of the component (for list and dataview).
In short, all you need to do is:
- Remember searched text.
- Use it for data filtering.
- Use it in the template to find and mark all text occurences.
In this example, the UI consists of two widgets: a Text view (standalone input for filtering) and a Datatable.
Step 1.
First, let’s setup the onTimedKeyPress handler for the Text input. Here we can get the current value of the input and use it for data filtering.
on: {
onTimedKeyPress: function() {
const value = this.getValue();
findText(value);
}
}
Step 2. Filtering and remembering the value.
The findText will activate filtering and make sure the value is stored somewhere for further usage. We’ll also use a RegExp to escape special characters in the stored value, if there’s any:
/* store text that should be highlighted */
text = text || "";
escapedSearchText = text.replace(charactersSet, "\\$&");
/* filter data */
table.filter(filteringFunction)
};
Step 3. Configuring template.
As we have already called filtering, the Datatable will show the results. This is the moment when the filtered data is rendered according to the related template.
columns:[{
id:"title",
template: searchColumnTemplate
}],
We’ll use another RegExp to find the searched text and add a span with a specific CSS for it:
let search = escapedSearchText;
if (search) {
value = addTextMark(value, search);
}
return value;
};
function addTextMark(value, text) {
const checkOccurence = new RegExp("(" + text + ")", "ig");
return value.replace(
checkOccurence,
"<span class='search_mark'>$1</span>"
);
}
You can see the results of this modification in the following demo.
You can find the source text of this note in the GitHub blog.
You are free to discuss the details or share your experience in the Webix community blog.
PS
You may be wondering why this functionality is not implemented in Webix immediately “out of the box”. The thing is that Webix offers web tools, a set of methods and setups for working with data and displaying it. More specific things, such as text highlighting, are left to the discretion of the end users and developers, who decide how their web application should work. The balance of functionality and simplicity makes Webix the product, valued for its speed and visibility of the development. We try not to overload our UI framework with excessive features, but we provide powerful tools for implementing any UX on developer side. If you haven’t tried Webix yet, download the free package to make your own web application.


