WEBIX JAVASCRIPT LIBRARY BLOG

UI development best practices, front-end programming tips and news to speed up your Web development.

Follow us:

Write for us: learn about our guest posts guidelines.

Working with nested data in Webix UI

We all like to use simple apps where an interface is easy and straight. Creating such apps is a breeze, just put some HTML tags, add a UI framework of your choice, something like Bootstrap, for example, and the app is ready. In real every-day development, things are bit different. It is common for a business app to work with complex data, that requires some advanced UI to represent it. A nested data is one of such use-cases. There is no a ready to use solution to show such kind of data in raw HTML or in Bootstrap. For such kind of task, you need a more powerful tool. Something like Webix UI.

Tree

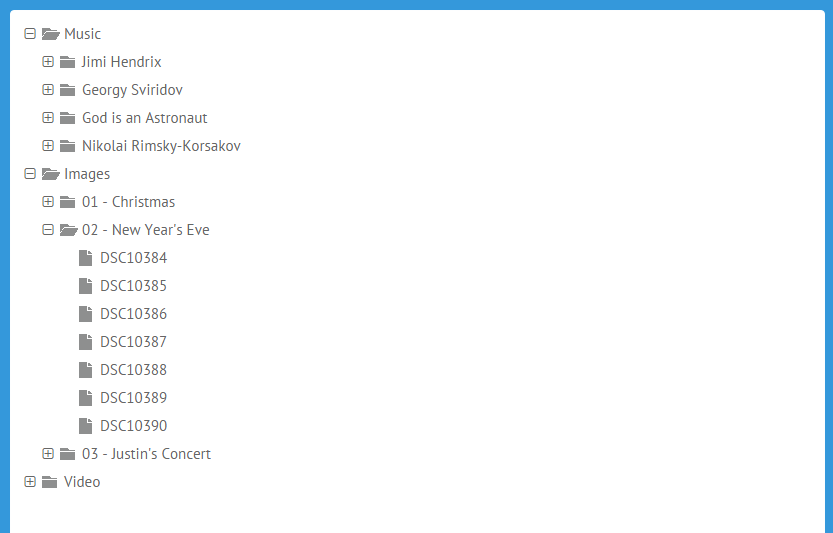
The simplest widget that can be used to show nested data is a Tree. It is common UI element for desktop apps, but still rare in web apps. Webix Tree has all common functionality of tree widget; it allows to represent the hierarchical data as a tree, where branches can be expanded or collapsed. Additionally, Webix Tree is really fast. It renders thousands of items in less than 1 second. And if that is not enough, you can utilize a dynamic loading feature to load data on demand.
webix.ui({
view: "tree", data: nested_data
});
 
Webix Tree

How to Build a Mega Menu with Webix

Unlike the regular menus that you can create using the Menu Component, Mega Menus are big and wide enough to allow you place other components and widgets within them. Such a type of menus is widely used on the online shopping websites since it’s pretty easy to use them for navigation purposes.

Here’s an example of how this menu works:

Mega menu built with webix

The demo of the final mega menu with its source code is here.

In this article, we’ll create our own mega menu with Webix in a few easy steps.

Tuning Webix for Odata

As we know, web app development is a complex process that, on the one hand, consists of laborious work at the backend and, on the other hand, includes plenty of efforts while creating a nice-looking and responsive UI.

If you want to optimize the construction of your web applications, you need to find the best option for organizing your work with data as well as a fast and powerful js library for drawing app interface.

This variant can be implemented by using OData, an open data protocol for building RESTful API’s, and by adapting Webix UI library to its rules of requesting and modifying data.

Odata protocol

OData’s goal is to enable a broad access to data regardless of the way it is stored. It allows requesting and updating resources via HTTP commands and provides an entire query language directly in the URL.

Well, if you are reading this post, you probably know a lot about Webix. If suddenly no, you can find more info here. All in all, I can say that our users find it fast and easy.

twitter review of webix

Customizing Kanban Board. Complex Structure and Swimlanes

Kanban boards allow visualizing the workflow in an easy and intuitive way. And Webix has a tool that allows you to create your own Kanban Board.

There’s already a well written guide that describes how you can use the Webix Kanban Board widget. This time we’ll take a look at some tips and tricks you can use to customize the existing project management application.

Splitting the Columns

First of all, the basics. Here’s how you can create a simple Kanban Board:

webix.ui({
    view:"kanban",
    type:"space",
    //the structure of columns on the board
    cols:[
        { header:"To Do",
          body:{ view:"kanbanlist", status:"new" }},
        { header:"Estimated",
          body:{ view:"kanbanlist", status:"estimated" }},
        { header:"In Progress",
          body:{ view:"kanbanlist", status:"work" }},
        { header:"Done",
          body:{ view:"kanbanlist", status:"done" }}
    ],
    //URL to the file with data collection
    url: "tasks.php"
});

And here’s the result:

Basic Kanban Board

Portal Layout Creation with Portlet

Webix version 2.4 brings you a new UI component that allows creating portal layouts in an easy and intuitive way. Portlet component can be dragged over the page and swapped with other portlets. This behaviour allows you to rearrange your web page elements the way you want. Let’s take a look at the basics of portlet usage.

Portlets Basics

You can create a basic portlet in the same way as other Webix UI components. Just set “portlet” as the view property value. The body property defines the portlet content:

view:"portlet", body:{
    // portlet content
}

By arranging portlets into rows and columns, you can create the required layout which can be easily reorganized if necessary:

rows:[
    { view:"portlet", body:{
        template:"Row 1"
    }},
    { view:"portlet", body:{
        template:"Row 2"
    }},
    { type:"wide", cols:[
         { view:"portlet", mode: "cols",body:{
            template:"Col 1"
        }},
         { view:"portlet", mode: "cols", body:{
            template:"Col 2",
        }}
    ]
    }
]

The result is shown below:

webix portlet widget

1 11 12 13 14 15 19