Creating projects with Webix Jet has become much more convenient since TypeScript support was introduced in version 1.3, and it requires just a few changes in the project. Change extensions of your source files and configure the toolchain, and you will get a smart autocomplete for Webix methods, hints on their use and code validation.
Read further to find out how to use Webix Jet with TypeScript or grab the typescript branch of the Jet starter pack.
Configuring the Toolchain
Step 1. Adding tsconfig
Begin with creating the tsconfig.json file that specifies the files of your project and compiler options.
Add paths to models and views to the object with compiler options:
{
"compilerOptions": {
...
"paths": {
"models/*":["sources/models/*"],
"views/*":["sources/views/*"]
}
},
...
}
Typing definitions for Webix widgets, mixin interfaces and parameters for their methods are stored in the webix.d.ts file. It is included in the main Webix package. So to include webix.d.ts into an app, add it to files in tsconfig.json:
{
...
"files":[
"node_modules/webix/webix.d.ts"
]
}
Also include your source .ts files:
{
...
"include":[
"sources/**/*.ts"
]
}
Check out the complete tsconfig.json.
Step 2. Configuring Webpack
Now let’s configure webpack to handle TypeScript. Go to webpack.config.js and change the entry point and other .js files to .ts, e.g.:
var config = {
entry: "./sources/myapp.ts",
...
resolve: {
extensions: [".ts", ".js"],
...
}
}
Use a different transpiler: ts-loader instead of babel-loader:
var config = {
...
module: {
rules: [
{
test: /\.ts$/,
loader: "ts-loader"
},
...
]
}
}
Step 3. Updating Dependencies
Don’t forget to update dependencies in package.json:
...
"ts-loader": "^3.2.0",
"tslint": "^5.9.1",
"typescript": "^2.6.2",
...
},
"dependencies": {
"webix-jet": "^1.3.7"
}
Start Coding
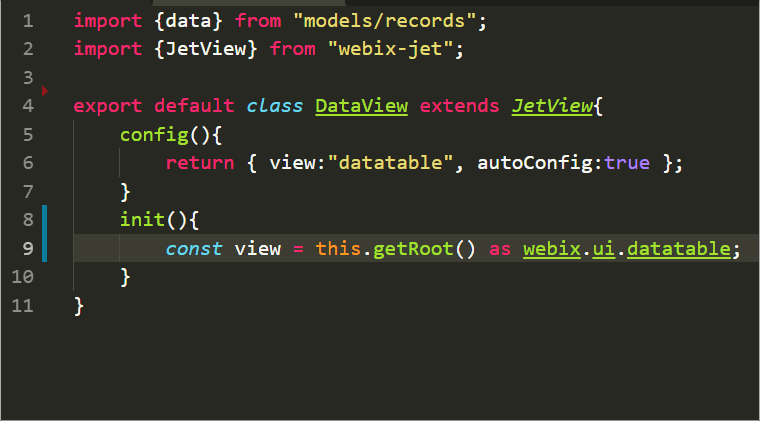
All view and model files now must have the .ts extension. There is no need to change anything in files, as webix-jet is imported in the usual way and typings are enabled automatically.
If you want to use the APPNAME and VERSION defined in package.json, declare constants injected by webpack in the app.ts file:
import {JetApp} from "webix-jet";
import "./styles/app.css";
declare var APPNAME;
declare var VERSION;
webix.ready(() => {
const app = new JetApp({
id: APPNAME,
version: VERSION,
start: “/top/start”
});
app.render();
});
Now you are ready to code. TypeScript enables autocompletion of Webix code and parameter hints in your IDE:
Some Extra Benefits
Typescript toolchain includes the tslint tool, which can be used to validate your code and ensure its quality. To enable it, add tslint.json with validation rules for TypeScript into your project.
After that, include a script for linting into package.json:
"lint": "tslint -p tsconfig.json",
...
}
Now you can run npm run lint to validate the codebase of your app.
Come to the TypeScript Side
Combining TypeScript with Webix Jet makes development more convenient. The Webix TypeScript declaration file is updated with each major update. Grab the starter package and share your coding experience with us.


